An ISO 8583 message simulator for payment switch testing
What the application is for, what it is made of, and how to get a message onto the wire in five minutes.
FlexSim is a desktop simulator for ISO 8583, the message format card payment switches speak. You use it to build a message by hand, send it to a host over TCP, and read back exactly what came out — byte by byte, and field by field.
It is built for the two jobs that come up constantly in payment integration work:
Around those two jobs it carries the machinery that payment testing actually needs: per-switch message definitions, encrypted card and key storage, EMV cryptogram generation (ARQC and ARPC), PIN block and CVV/PVV calculation, DUKPT key derivation, and a TLV decoder.
Anyone testing against a payment switch: integration and QA engineers, certification teams, and support staff reproducing a reported problem. It assumes you know roughly what an ISO 8583 data element is; it does not assume you have used FlexSim before.
Six things make up everything you will do in FlexSim. Getting these straight now saves a lot of confusion later.
| Piece | What it is |
|---|---|
| Spec profile | The description of one switch's message format — which data elements exist, how long each one is, how it is encoded (ASCII, EBCDIC, binary), what headers wrap the message, and how the bitmap is written. Four ship with the application. One profile is active at a time, and it governs how every message is built and parsed. |
| Test suite | A named folder of test cases. A suite belongs to one spec profile, so switching profiles changes which suites you see. |
| Test case | One message. It records which data elements are switched on, what value each one carries, and where that value comes from. A test case can also carry a response definition (what to reply when it is answering) and a reversal definition (what to send after its request has been answered). |
| Card profile | One card's data: PAN, expiry, service code, track 2, PIN, PIN block, CVV/CVV2/iCVV, PVV, sequence number — plus which keys that card uses. Everything sensitive is encrypted in the database. |
| Key | A piece of key material (ZMK, ZPK, AC, SMI, SMC, PVK, CVK) held once and referenced by name from any number of card profiles. |
| Connection | Where to send, or where to listen: host, port, client or server, timeouts. |
The chain runs: a test case lives in a suite, which belongs to a spec profile. The test case may be linked to a card profile, which references keys. Sending it uses the connection.
FlexSim is portable. There is no installer, no registry use, and nothing to uninstall. On Windows and Linux the package contains just two items:
FlexSim.exe                 the whole application
Assets\simulator.db         the first-run template database
Unpack the archive anywhere you can write to and run FlexSim.exe. On Linux
and macOS the download is a .tar.gz rather than a zip, because a zip cannot
record the executable bit.
The macOS build is shipped as a FlexSim.app bundle and is not signed, so the
first launch needs right-click → Open, or
xattr -dr com.apple.quarantine FlexSim.app from a terminal.
Your work — cards, keys, suites, test cases, settings and the message log — is never stored next to the program. It lives in one fixed place per user:
| Platform | Database |
|---|---|
| Windows | %LocalAppData%\FlexSim\simulator.db |
| Linux | ~/.local/share/FlexSim/simulator.db |
| macOS | ~/Library/Application Support/FlexSim/simulator.db |
On the very first run the bundled template is copied there. After that the template is never used for your data again, so you can delete, move or replace the program folder and keep everything.
To back up or move your work to another machine, copy that one
simulator.db file — with FlexSim closed, so nothing is left in the
write-ahead log. See Appendix D.
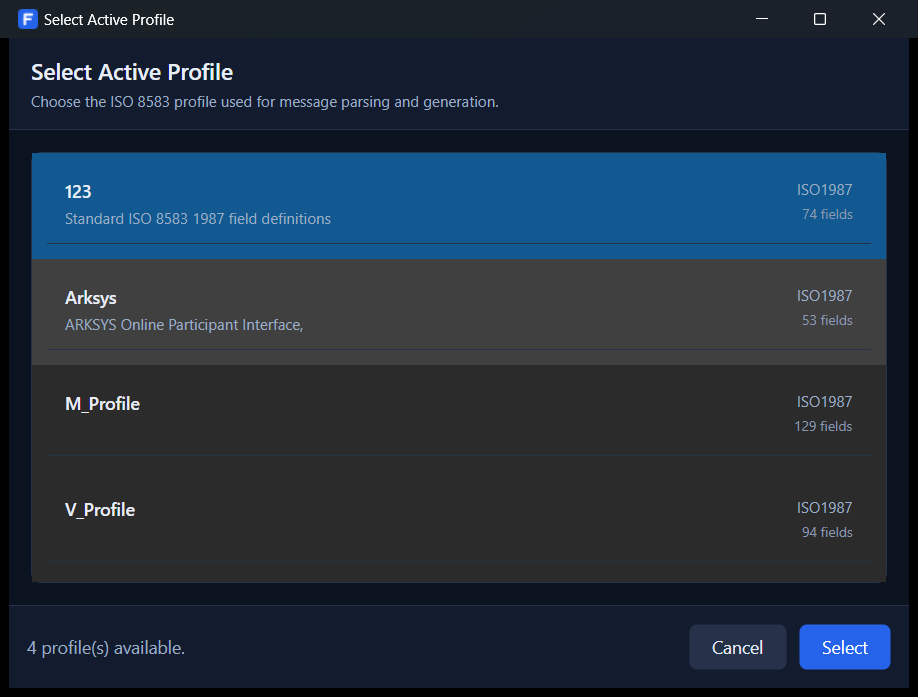
Every launch begins by asking which spec profile to use. Nothing else opens until you answer, because the profile decides how every message is built and read.
Four profiles ship with the application:
| Profile | What it describes |
|---|---|
| 123 | The Egyptian Banks Company NPS format — ASCII, six application headers, 74 data elements, with the framed DE-57 token buffer and the nested DE-106 TLV tree. (Older installations show this profile under its original name, EBC.) |
| Arksys | Euronet Host-to-Host. EBCDIC throughout, except the bitmap (ASCII hex characters), DE-52 (PIN, ASCII) and DE-55 (ICC, binary). No application headers — the two-byte length header is transport framing only. |
| V_Profile | A Visa message definition, 94 data elements. |
| M_Profile | A Mastercard message definition, 129 data elements. |
You are not locked in: the active profile can be changed at any time from the status bar without restarting — see section 8.
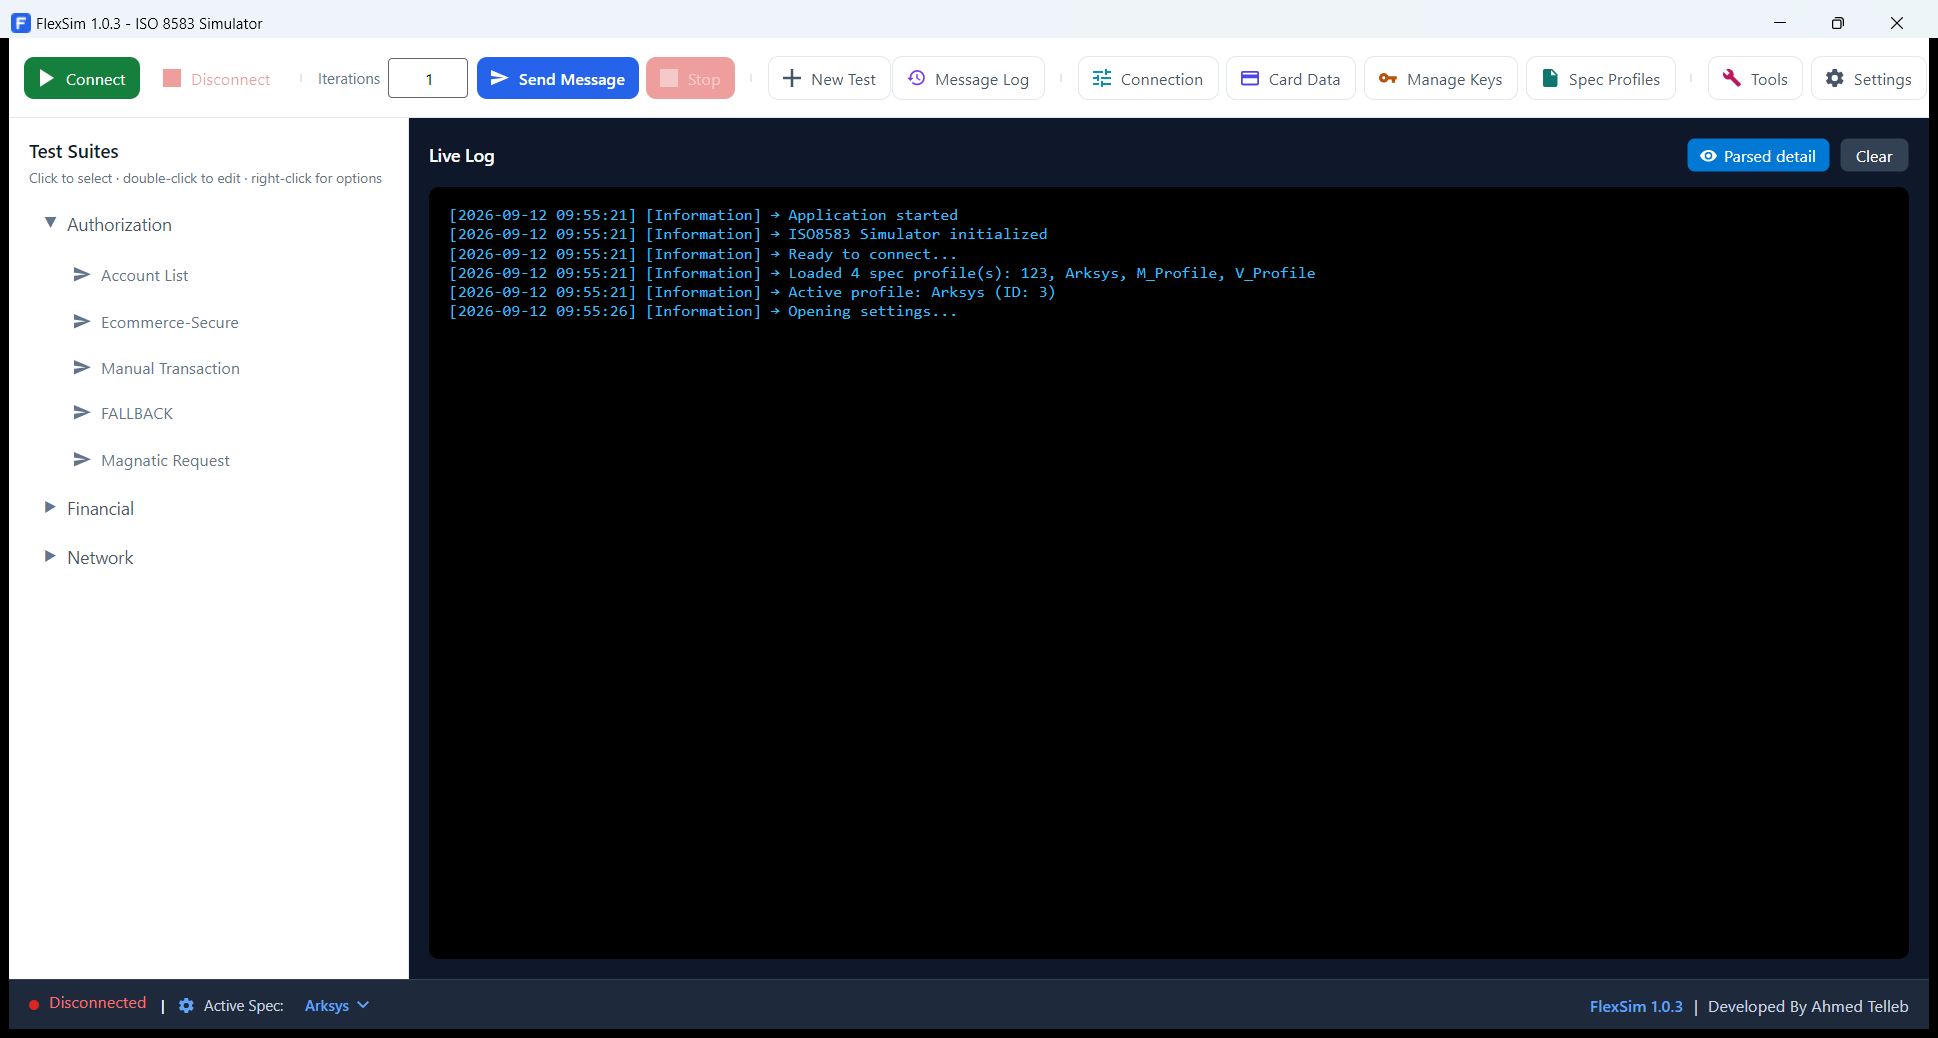
This walkthrough gets one message out and one reply back. It uses the test cases that come with the application, so nothing needs building first. You will need something listening on a TCP port — a real test host, or any simple echo server on your own machine.
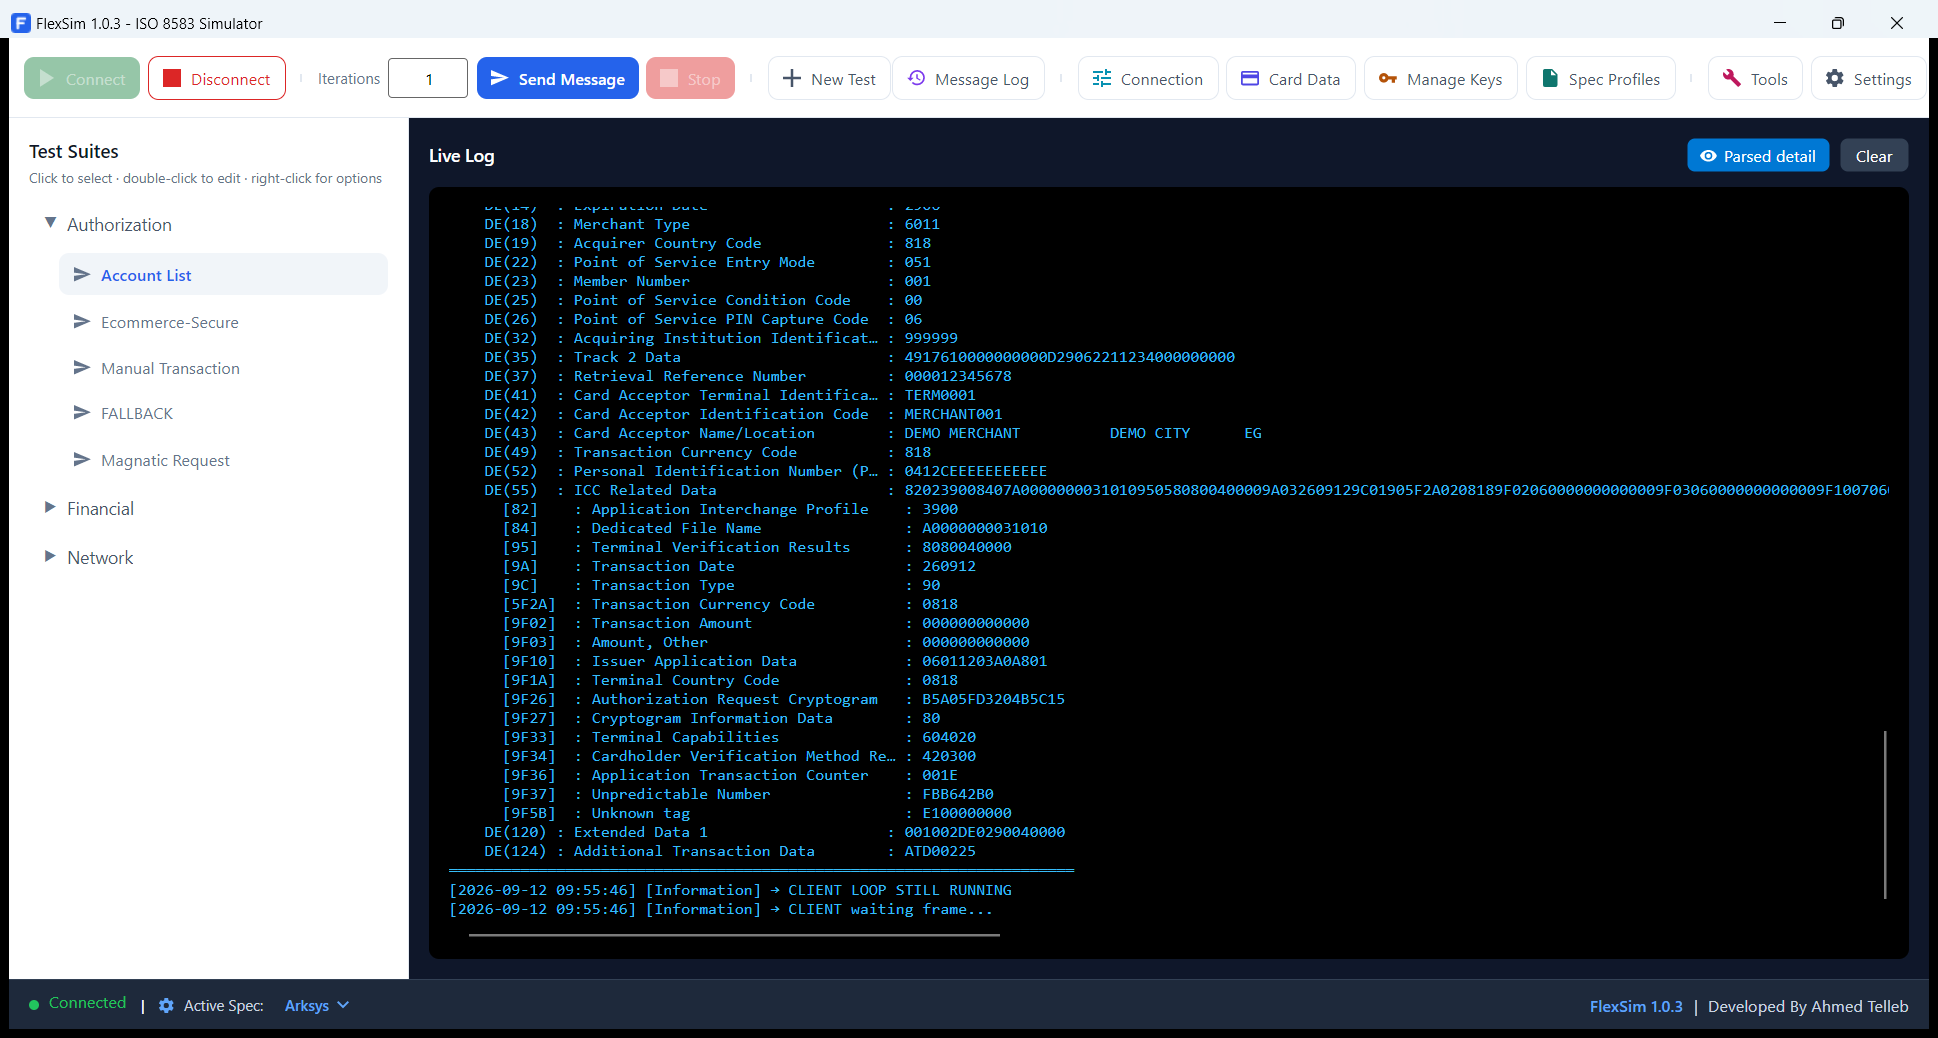
Anything that accepts a TCP connection and writes the bytes back will do to prove the send path works. FlexSim frames messages with a two-byte big-endian length header followed by the payload, so a peer only needs to read two bytes, read that many more, and reply the same way.
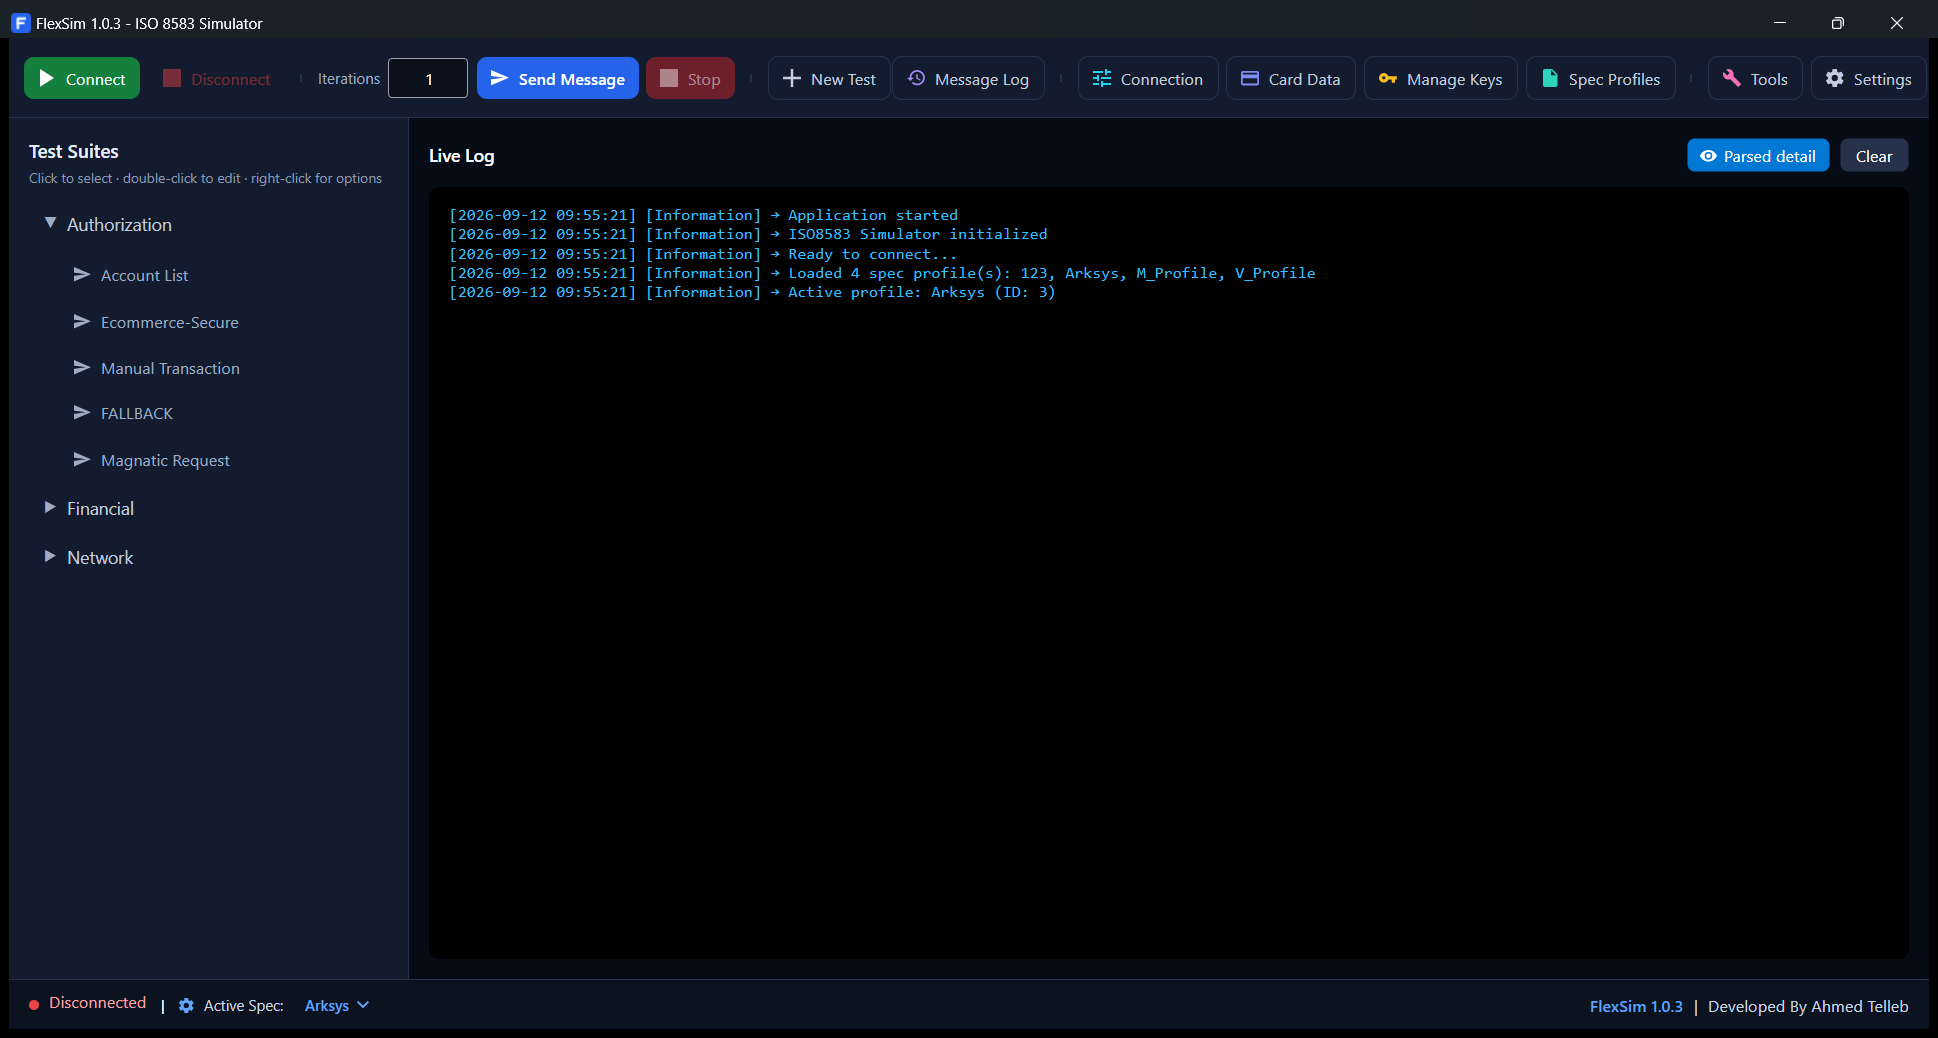
Everything on the one screen you will spend most of your time in.
The toolbar is in two halves. On the left are the things you do to run a message; on the right are the things you set up beforehand.
| Control | What it does |
|---|---|
| Connect | Opens the connection using whatever the Connection window holds — dials out in client mode, starts listening in server mode. |
| Disconnect | Closes it. Disabled until you are connected. |
| Iterations | How many times pressing Send repeats. Each send waits for its reply before the next one goes; a timeout stops the run. When the selected test case is a responder, this becomes how many requests to answer before disarming. |
| Send Message | Builds and sends the selected test case. Ctrl+Enter does the same. If the selected case is a responder, the button is retitled Listen for Request and pressing it arms the responder instead of sending. |
| Stop | Ends the run after the message currently in flight, or disarms an armed responder. |
| New Test | Opens an empty test case editor for the active spec profile. |
| Control | What it opens |
|---|---|
| Message Log | Everything sent and received, stored in the database, with the hex, the ASCII and the parsed breakdown of each one. |
| Connection | Host, port, client or server, timeouts. |
| Card Data | Card profiles — PAN, expiry, track data, security values, and which keys each card uses. |
| Manage Keys | The shared key store the card profiles select from. |
| Spec Profiles | The message definitions: fields, headers, encodings and subfield structure. |
| Tools | Reference calculators — card values, an encoding converter, key utilities and a TLV decoder. |
| Settings | Theme, log files, log colours and database protection. |
Card Data, Manage Keys, Connection and Message Log open at most one instance. Pressing the button again brings the existing window to the front rather than opening a second copy. All four are owned by the main window, so they close with it.
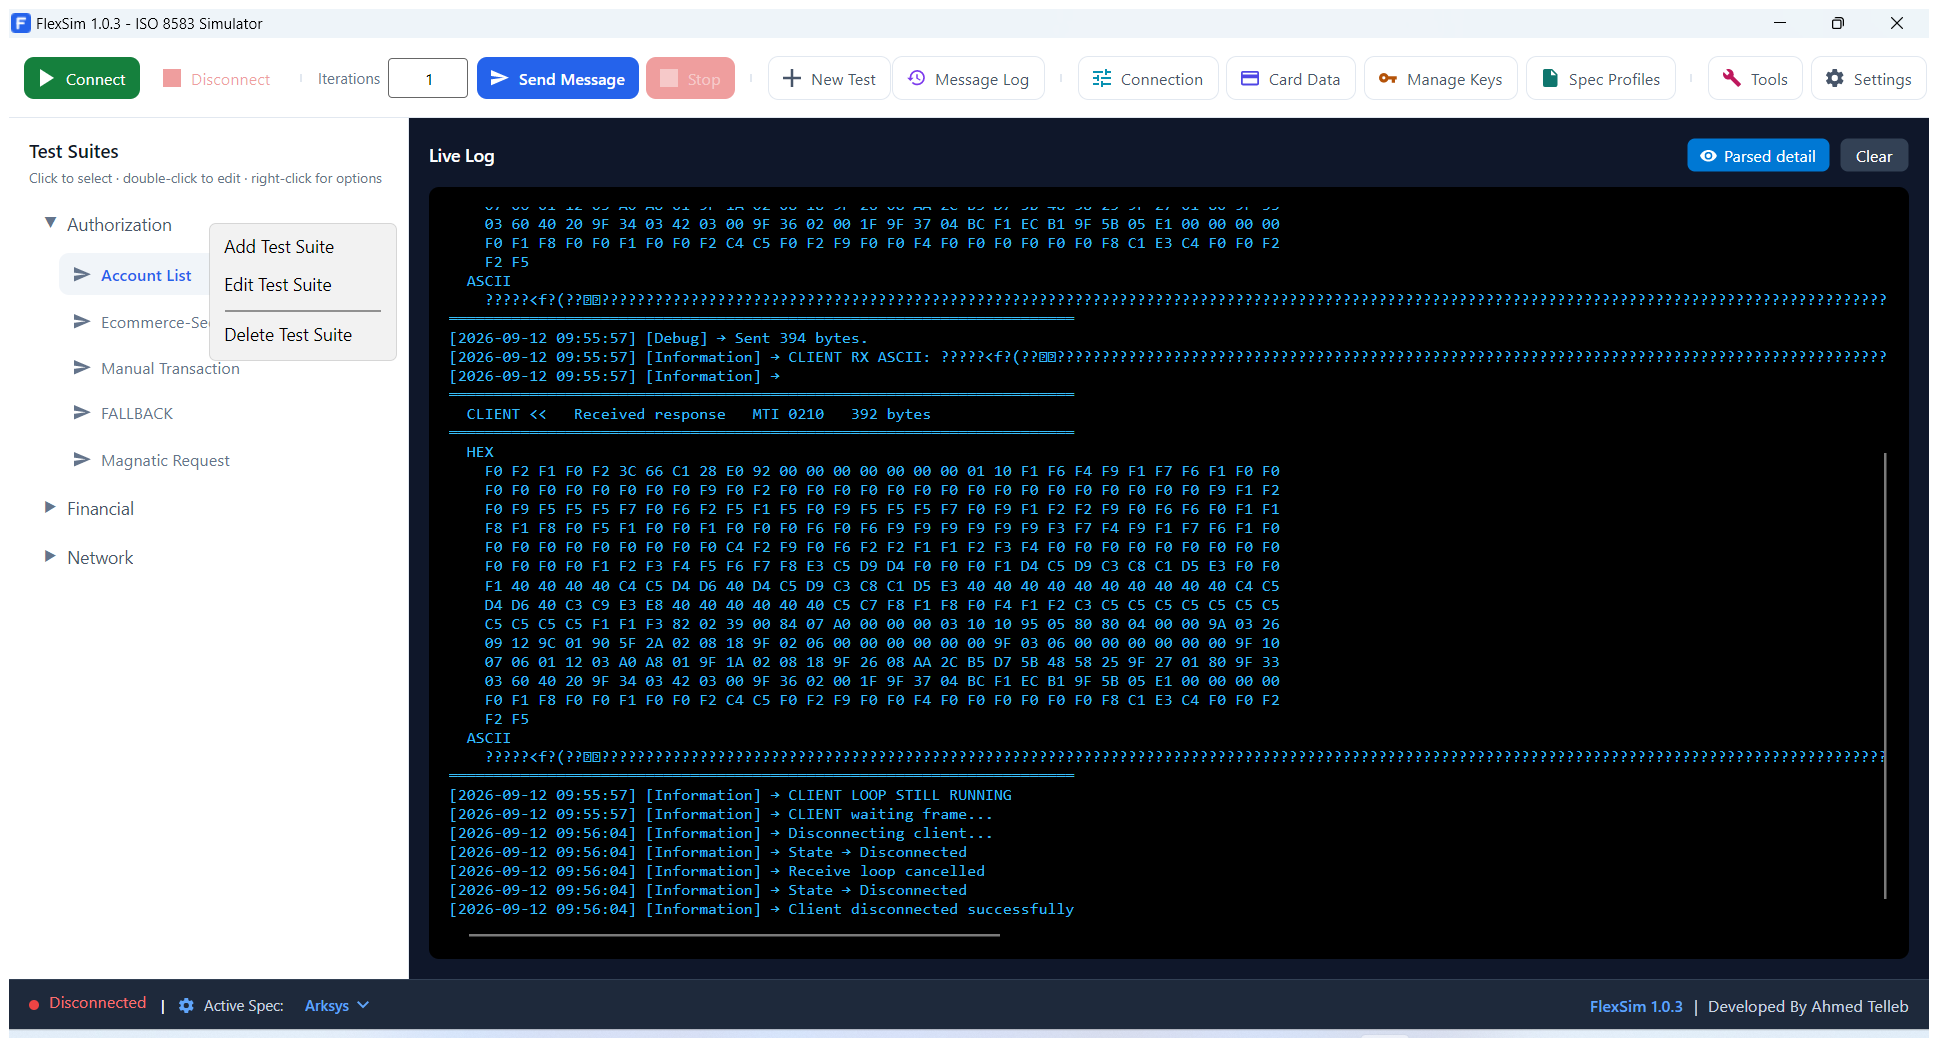
The left-hand panel lists the suites belonging to the active spec profile, and the test cases inside each one. Its three gestures are printed under the heading:
Each test case row carries small markers summarising what it does — whether it sends or answers, and whether its reply is checked. Hovering a row spells the same thing out in words.
The tree is rebuilt from scratch on every save, delete and profile switch, but which suites are open survives that. A suite you deliberately collapsed stays collapsed; the suite holding the selected test case opens when the selection moves, not on every rebuild.
The dark panel on the right is a running commentary on everything the application does: connection state changes, each message sent and received, and any warning about why a value could not be produced.
Two controls sit above it:
| Control | What it does |
|---|---|
| Parsed detail | Switches the field-by-field breakdown under each message on and off. With it off you get the hex and the ASCII only. The icon changes with the state, so it is readable without relying on the fill colour. |
| Clear | Empties the on-screen log. It does not touch the log files or the message log in the database. |
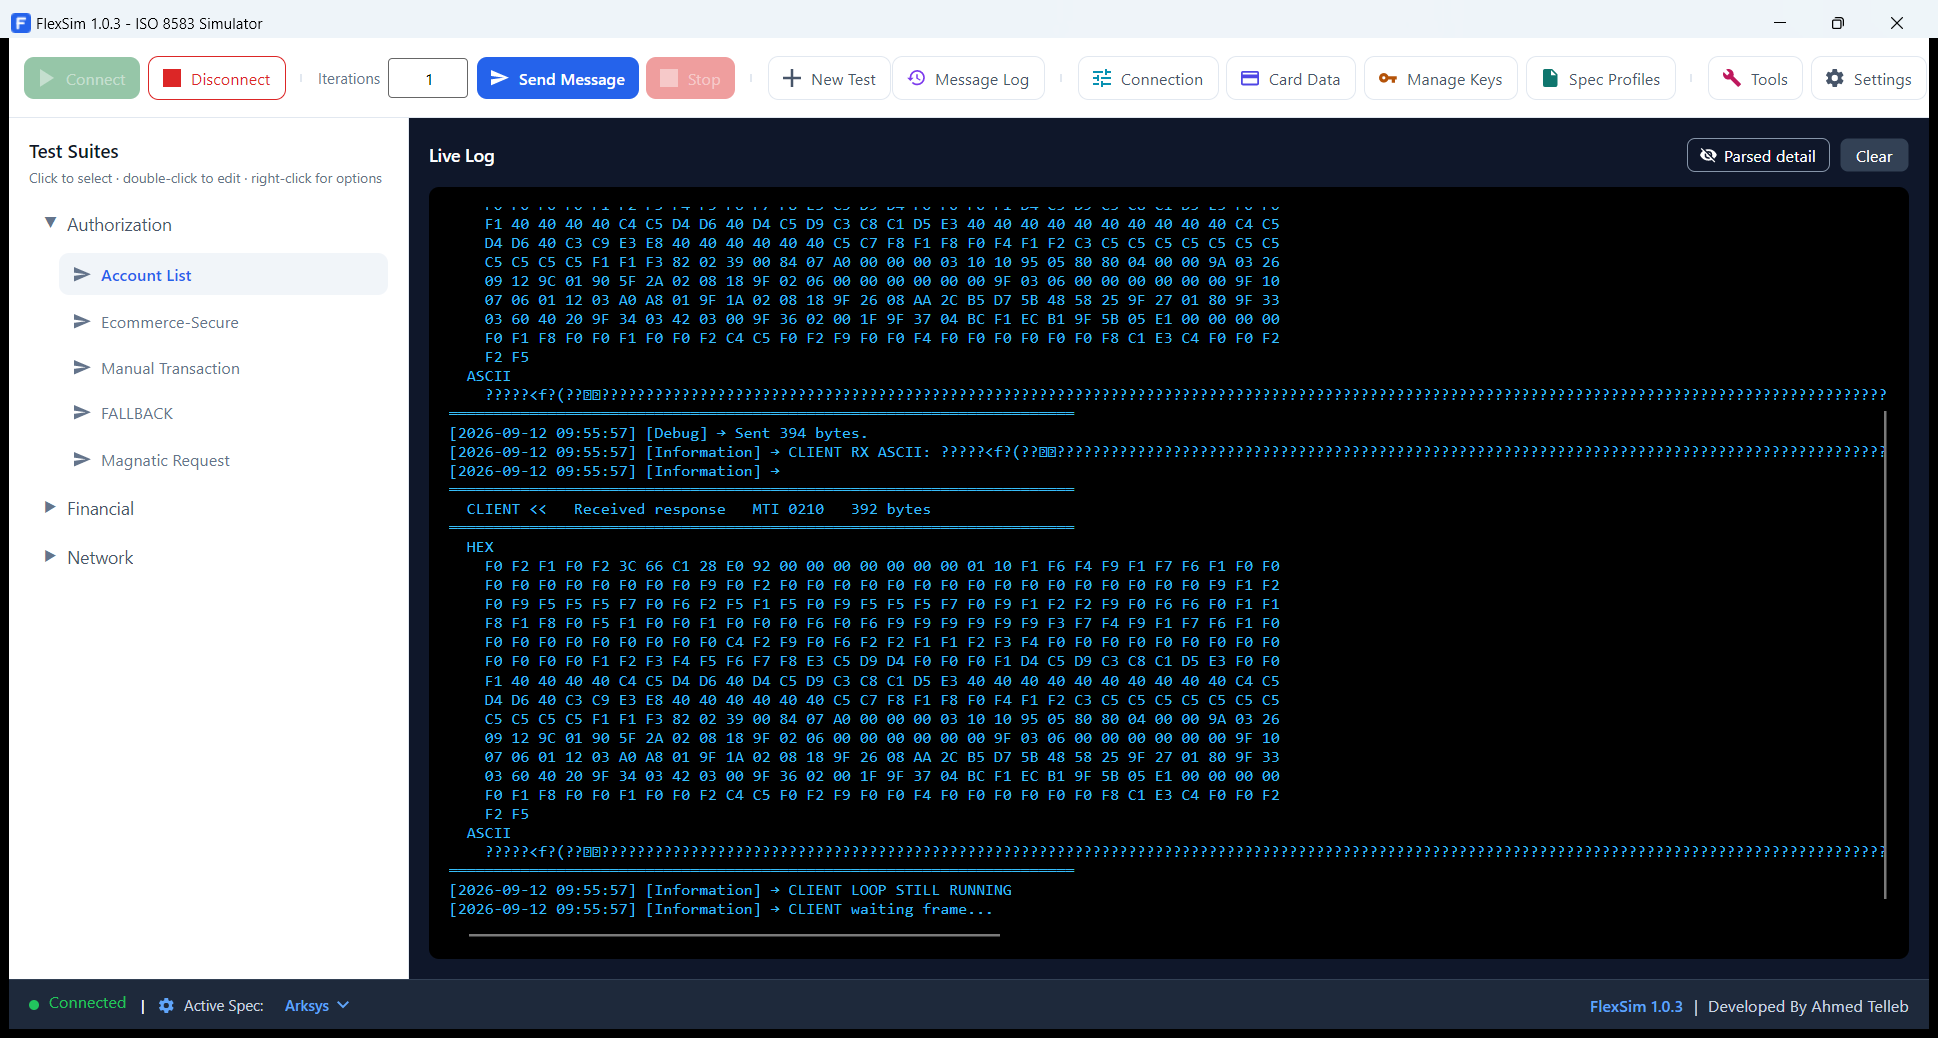
Everything shown here is also written to a log file on disk, unless you turn that off in Settings. The on-screen log is never trimmed automatically.
The bar along the bottom shows four things: the connection state and its indicator light, the active spec profile, the version you are running, and the author.
The profile name is a button. Pressing it reopens the picker, so you can change the active spec profile without restarting.
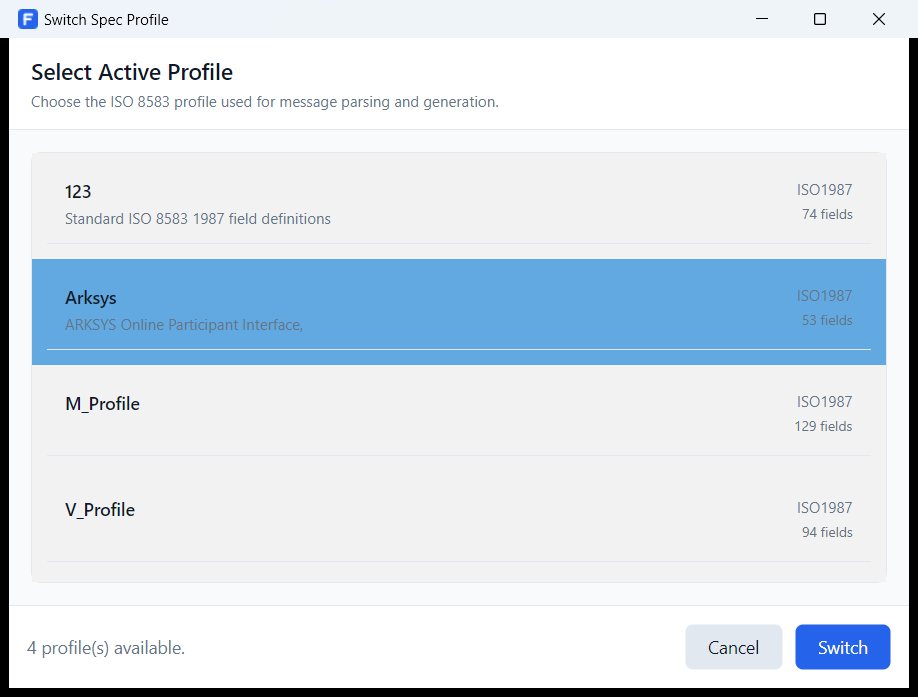
Suites and test cases belong to a profile, so switching reloads the tree and drops the current test case selection. A switch is refused while a run is in progress.
The connection, the keys, the cards and the message definitions — the material every test case is built from.
Connection on the toolbar opens the transport settings. There is one connection record, shared by everything.
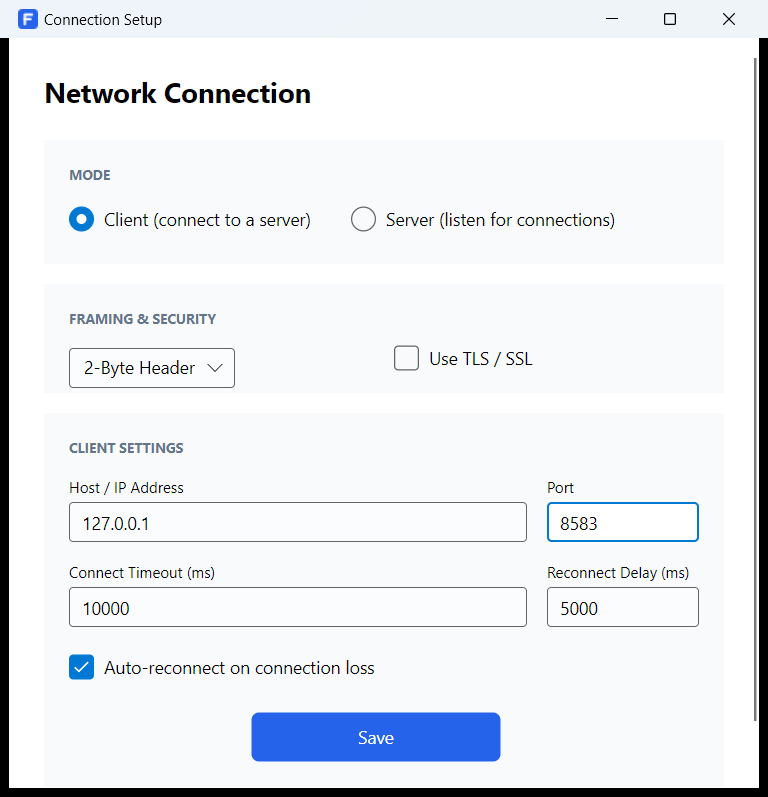
| Setting | Meaning |
|---|---|
| Mode | Client connects out to a host. Server listens on the port and waits for the other side to dial in. Both modes can send and both can answer. |
| Host / IP Address | Where to connect, in client mode. Ignored in server mode. |
| Port | The port to connect to, or the port to listen on. |
| Connect Timeout (ms) | How long to wait for the TCP connection to come up before giving up. |
| Reconnect Delay (ms) | How long to wait before retrying, when auto-reconnect is switched on. |
| Auto-reconnect on connection loss | Reopen the connection by itself if it drops. |
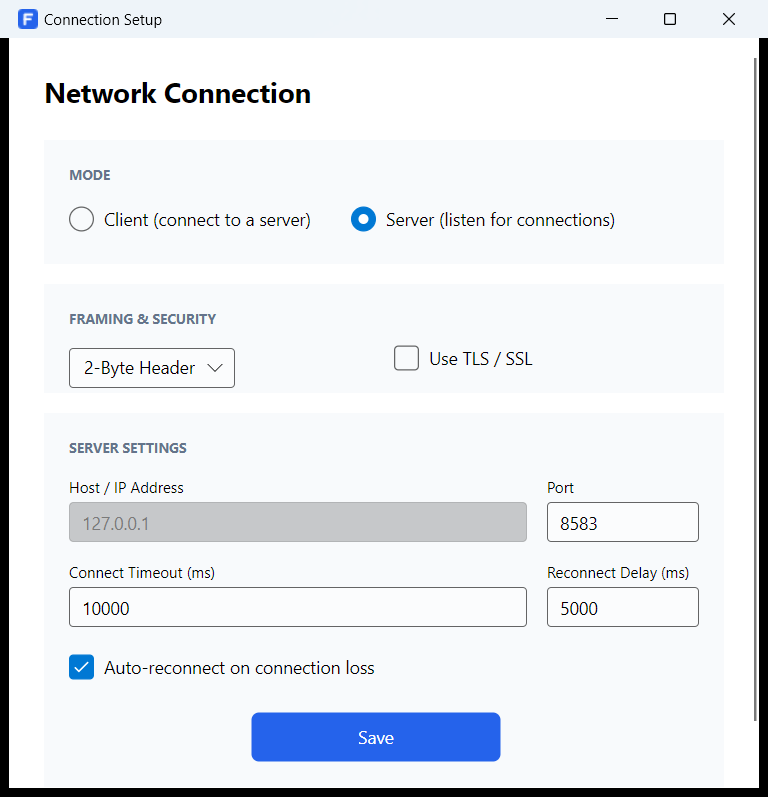
Press Save to store the settings. Changes take effect the next time you press Connect.
The Framing & Security group is stored but is not yet applied to the transport. Every connection uses the two-byte big-endian length header regardless of the dropdown, and the Use TLS / SSL checkbox does not currently switch the connection to TLS. See Appendix F.
Key material is held in one shared store and referenced by name. A key is entered once and any number of card profiles can point at it, so rotating a key is one edit rather than one per card.
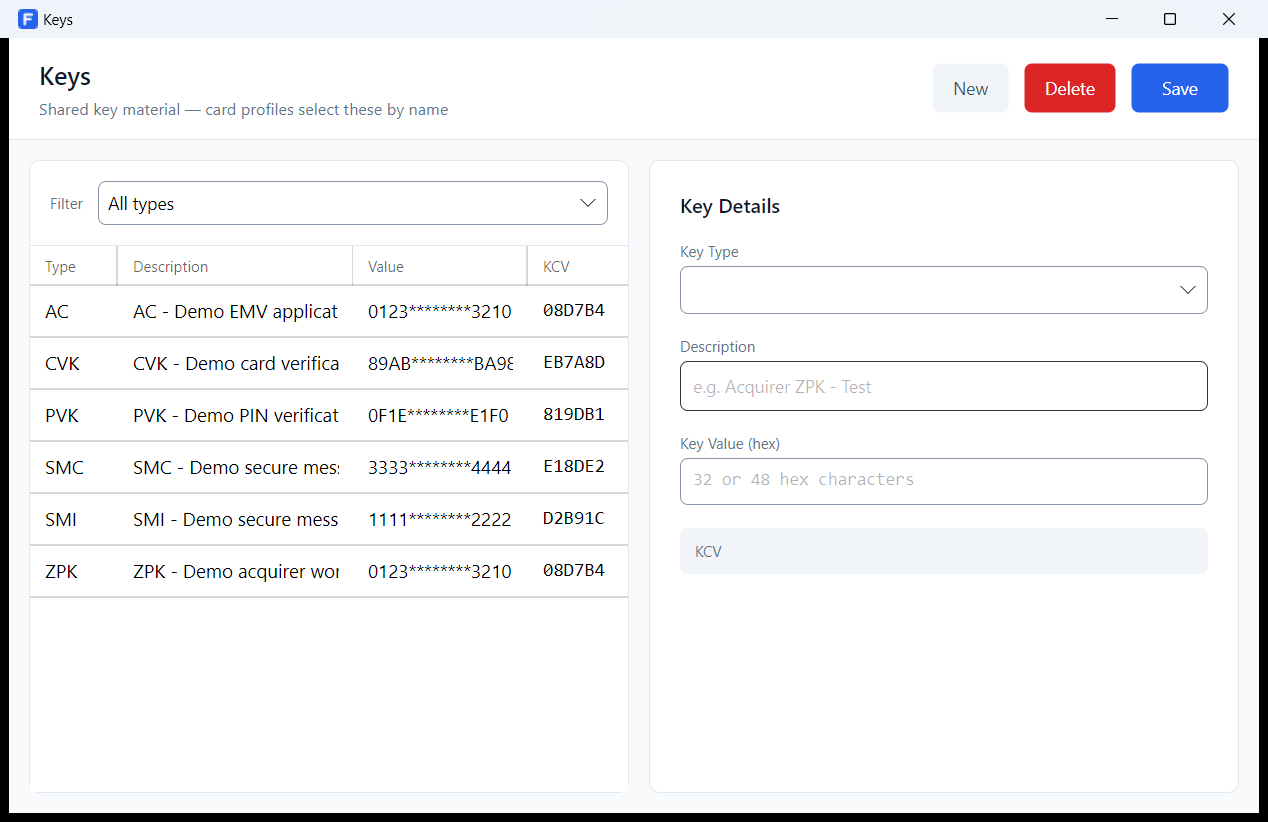
The check value is recomputed as you type, so a mistyped digit shows up before the key is ever used in a cryptogram. If the KCV does not match what the other side expects, the key is wrong — do not go looking for the problem in the message.
| Type | Used for |
|---|---|
| ZMK | Zone master key — the key other keys are exchanged under. |
| ZPK | Zone PIN key — encrypts the PIN block. |
| AC | EMV application cryptogram master key — the root of the ARQC and ARPC chain. |
| SMI | Secure messaging integrity key. |
| SMC | Secure messaging confidentiality key. |
| PVK | PIN verification key — produces the PVV. |
| CVK | Card verification key — produces CVV, CVV2 and iCVV. |
A double-length 3DES key whose two halves are identical is only as strong as single DES, and .NET refuses to use it. Such a key will save, but every cryptogram built with it will fail. Use halves that differ.
Card Data holds the cards your test cases draw values from. Pick a card in the list on the left and its details fill the panel on the right.
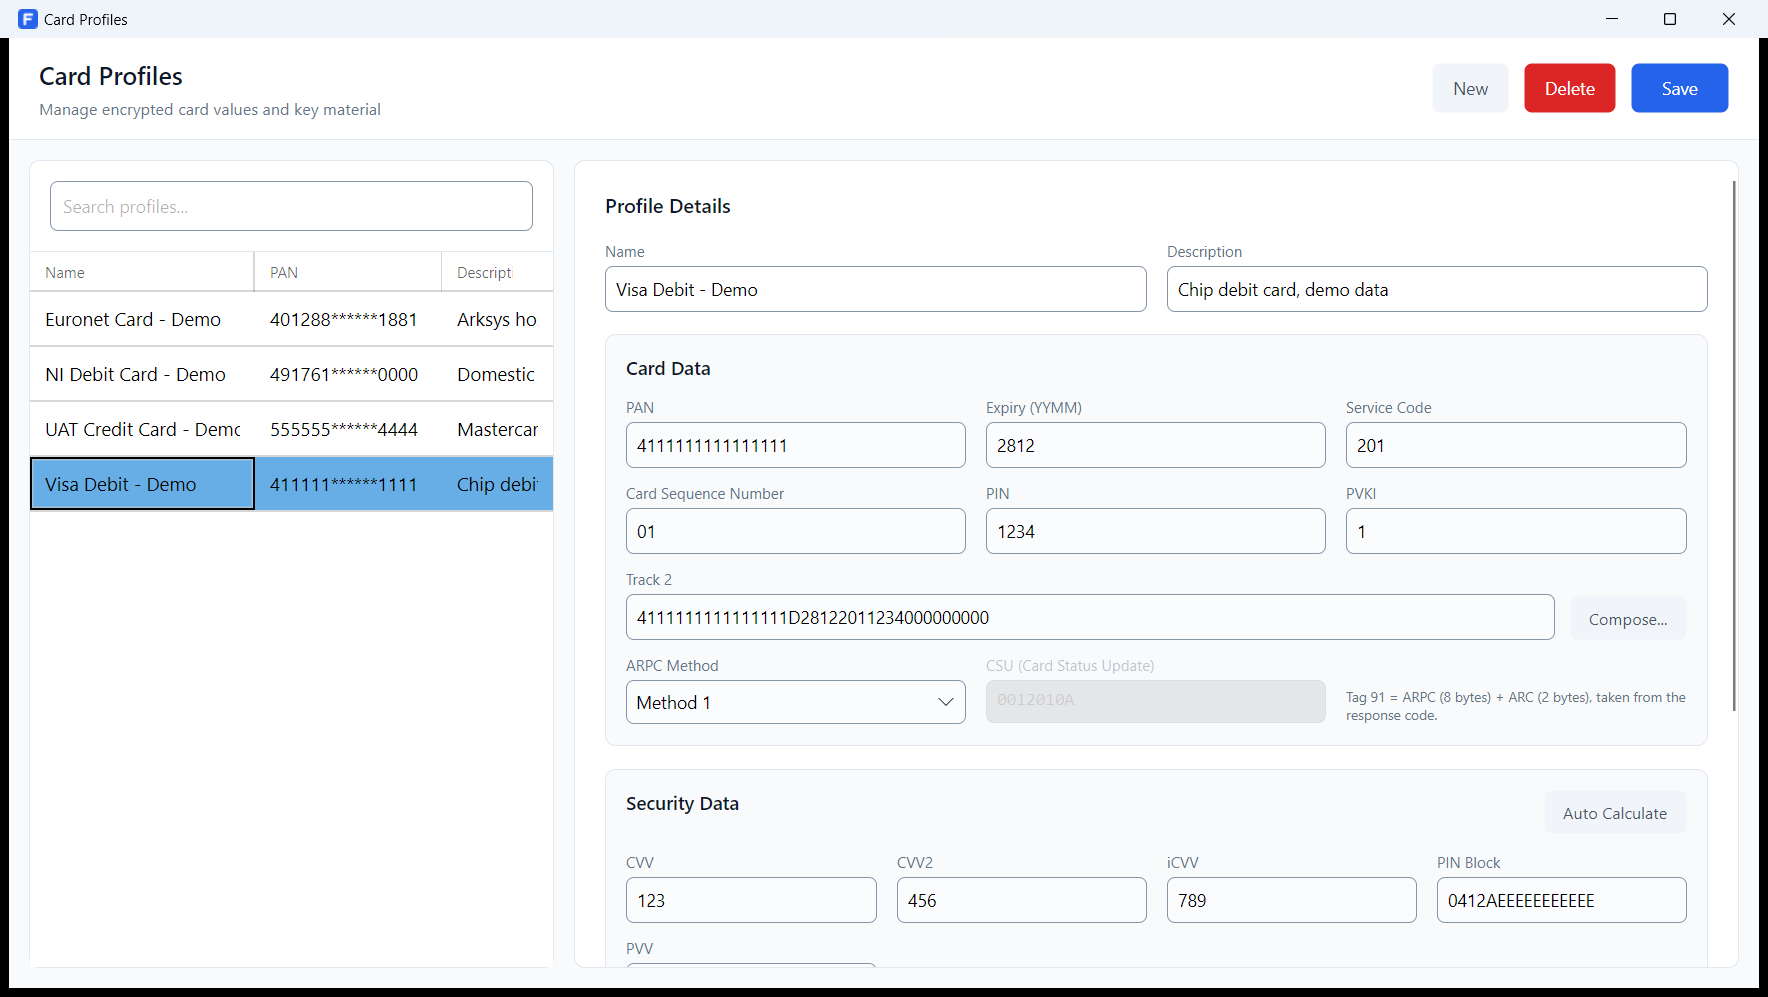
| Field | Notes |
|---|---|
| PAN | The primary account number, 16 or 19 digits. |
| Expiry (YYMM) | Four digits, year first. |
| Service Code | Three digits. Feeds the CVV calculation and track 2. |
| Card Sequence Number | EMV tag 5F34. Feeds the derivation of the card's unique key from the AC master key, so it must match the card. |
| PIN | The clear PIN. Feeds the PVV and the PIN block. |
| PVKI | PIN verification key index, 1–6. Feeds the PVV and travels in track 2. |
| Track 2 | The full track. Type it, or build it with Compose… — see section 12. |
| ARPC Method | How this issuer answers a cryptogram. Method 1 encodes the decision in the response code; Method 2 encodes it in the CSU. |
| CSU | Card Status Update, four bytes of hex. Method 2 only — the box is disabled under Method 1, where it means nothing. |
The Security Data group holds CVV, CVV2, iCVV, PIN block and PVV. You can type them, or press Auto Calculate to derive them from the card values and the selected keys.
There is no chip variant of the PVV the way iCVV is one of CVV — the calculation has no service code or expiry in it. A second PVV comes from a different PVKI, which is a card field of its own.
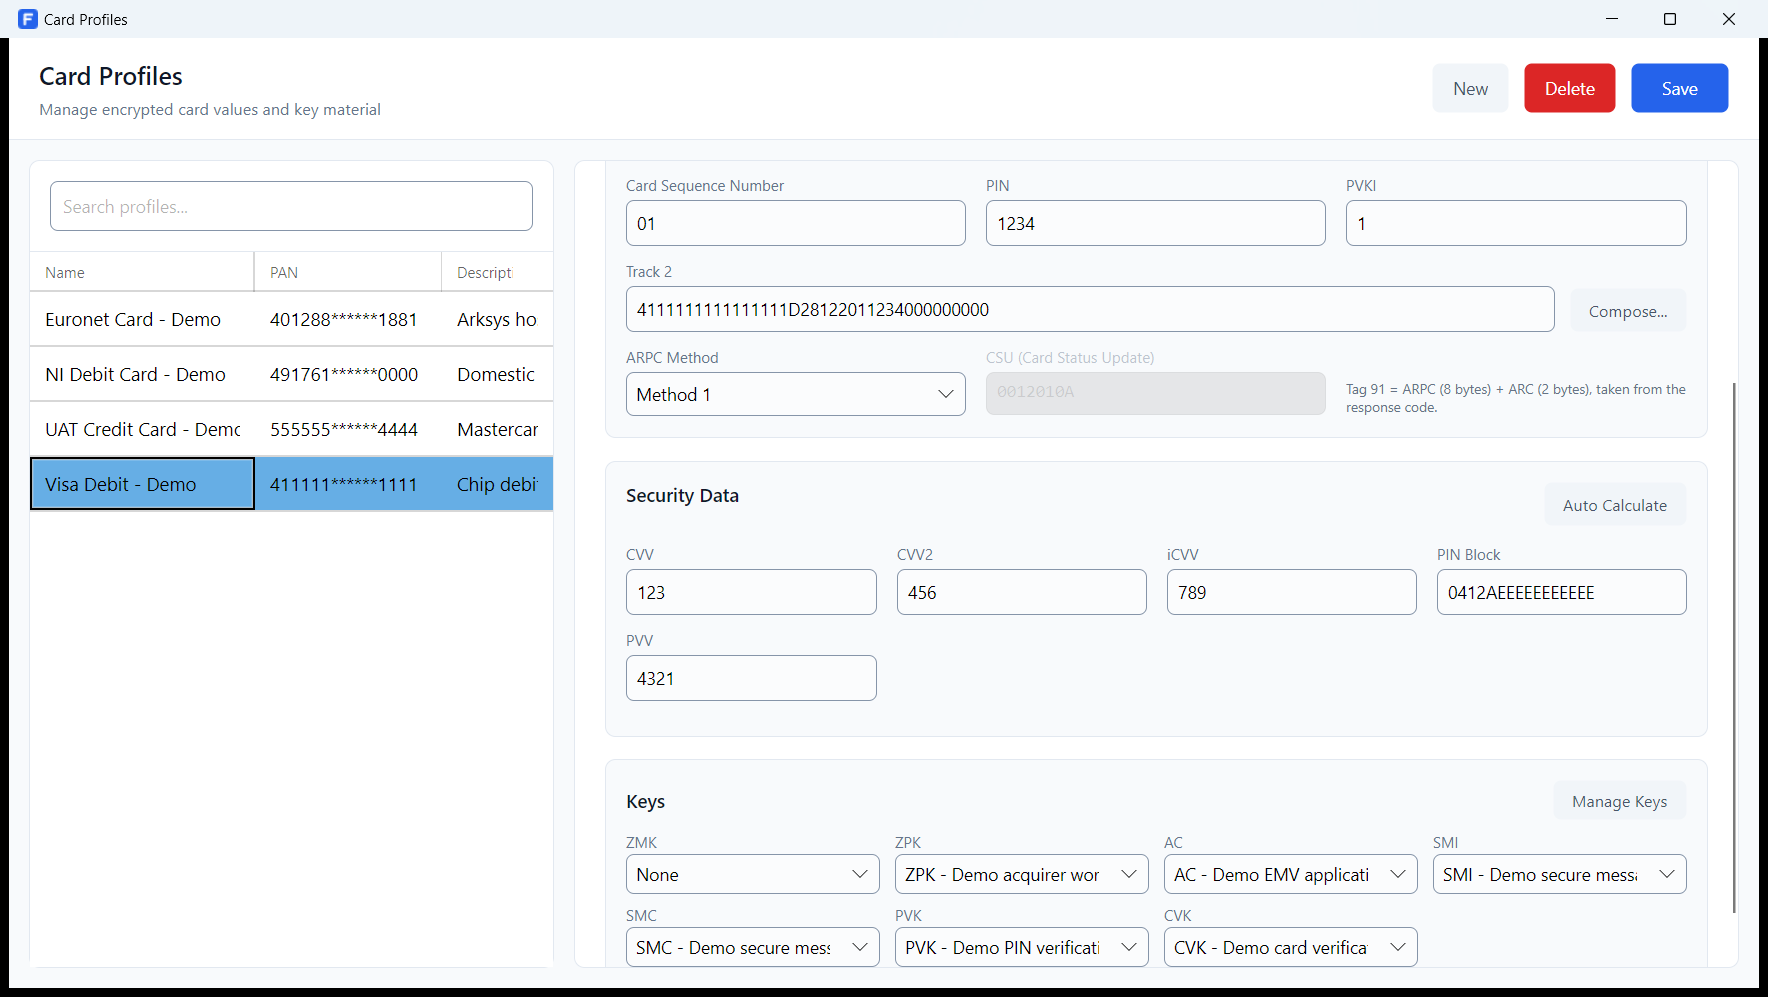
These are references, not copies. Change a key's value in the key manager and every card pointing at it follows.
Compose… next to the Track 2 box builds the track from the values already on the card, and lets you decide what goes in it and in what order.
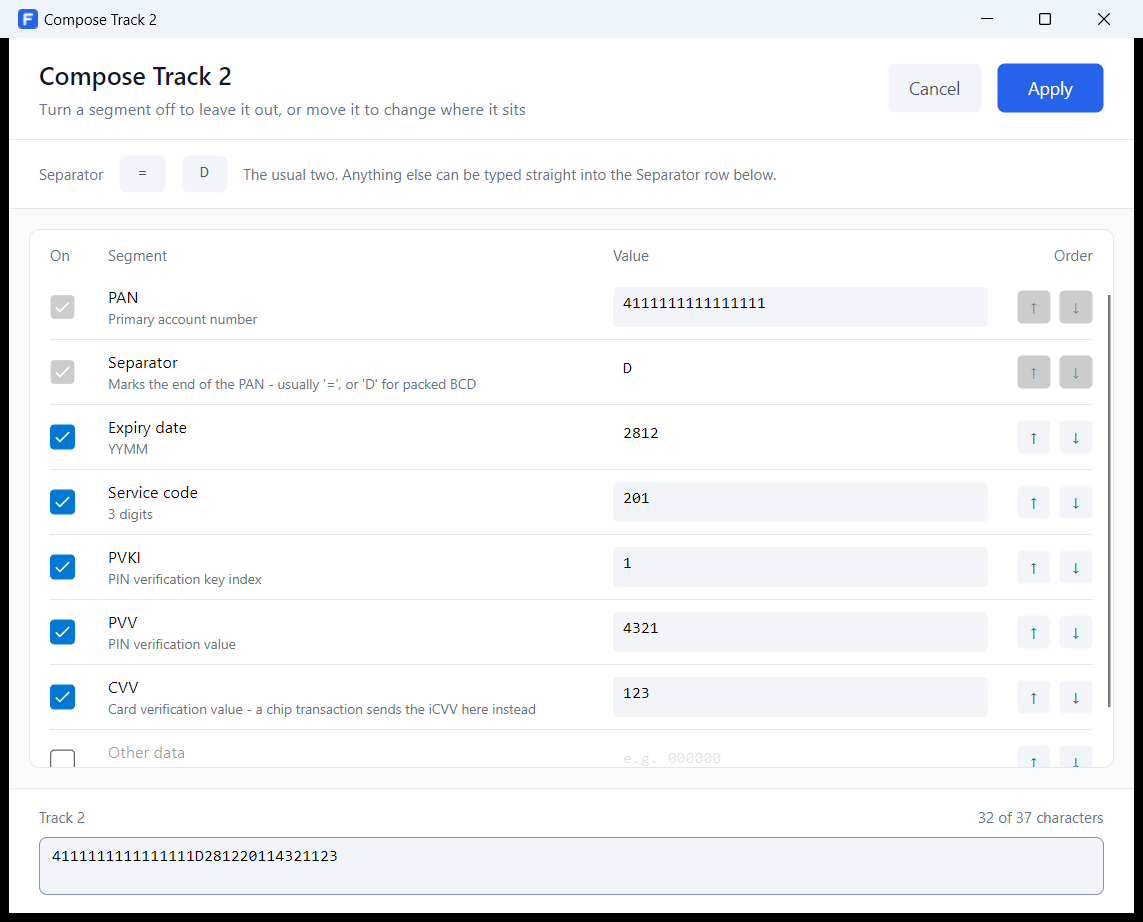
= and D
are one-click buttons because they are the usual two, but any character can go in
the row.When a message carries DE-55, FlexSim replaces the CVV inside DE-35 with the card's iCVV as the message is built. It rebuilds the track from the saved layout only when doing so reproduces the track being sent; otherwise it replaces the CVV in place, and if it cannot do that unambiguously it leaves the track alone and logs why.
A spec profile is the application's description of one switch's message format. It is not your data — it is a statement of how that switch expects messages to look — and it governs both how FlexSim builds a message and how it reads one back.
Spec Profiles on the toolbar opens the editor. The list on the left holds every profile; the panel on the right holds the one you have selected, in three collapsible sections.
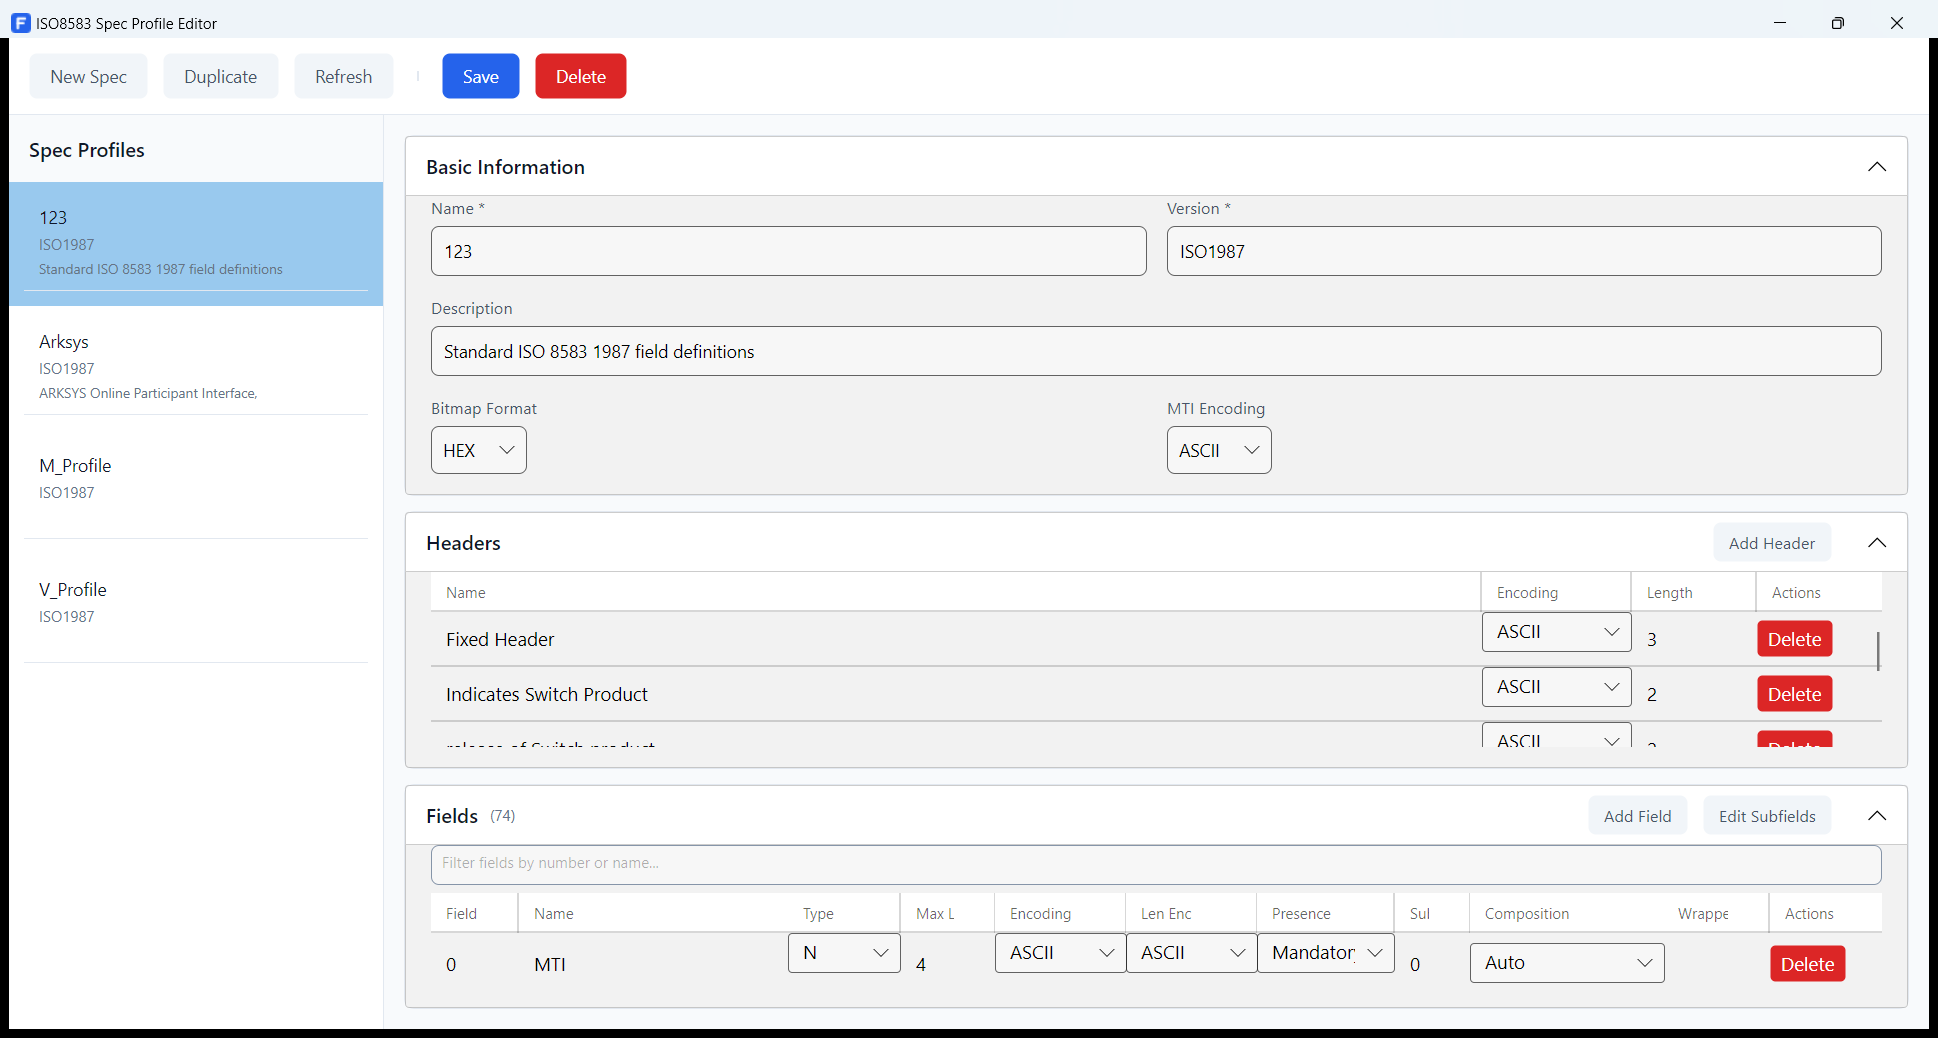
| Field | Meaning |
|---|---|
| Name | What the profile is called in the picker and the status bar. |
| Version | Free text, e.g. ISO1987. |
| Description | Shown under the name in the picker. |
| Bitmap Format | HEX writes the bitmap as hex characters; BINARY writes it as raw bytes. |
| MTI Encoding | ASCII, EBCDIC or BINARY. |
Application headers that go in front of the MTI — the NPS profile has six of them, Arksys has none. Each row is a name, an encoding and a length.
The two-byte length header at the front of every frame is transport framing and is added by the connection, not by the profile. Do not add a header row for it.
The Fields section is the bulk of a profile — one row per data element. Because a profile can hold 130 of them, two things make it workable: the filter box, and collapsing the sections above so the grid gets the whole panel.
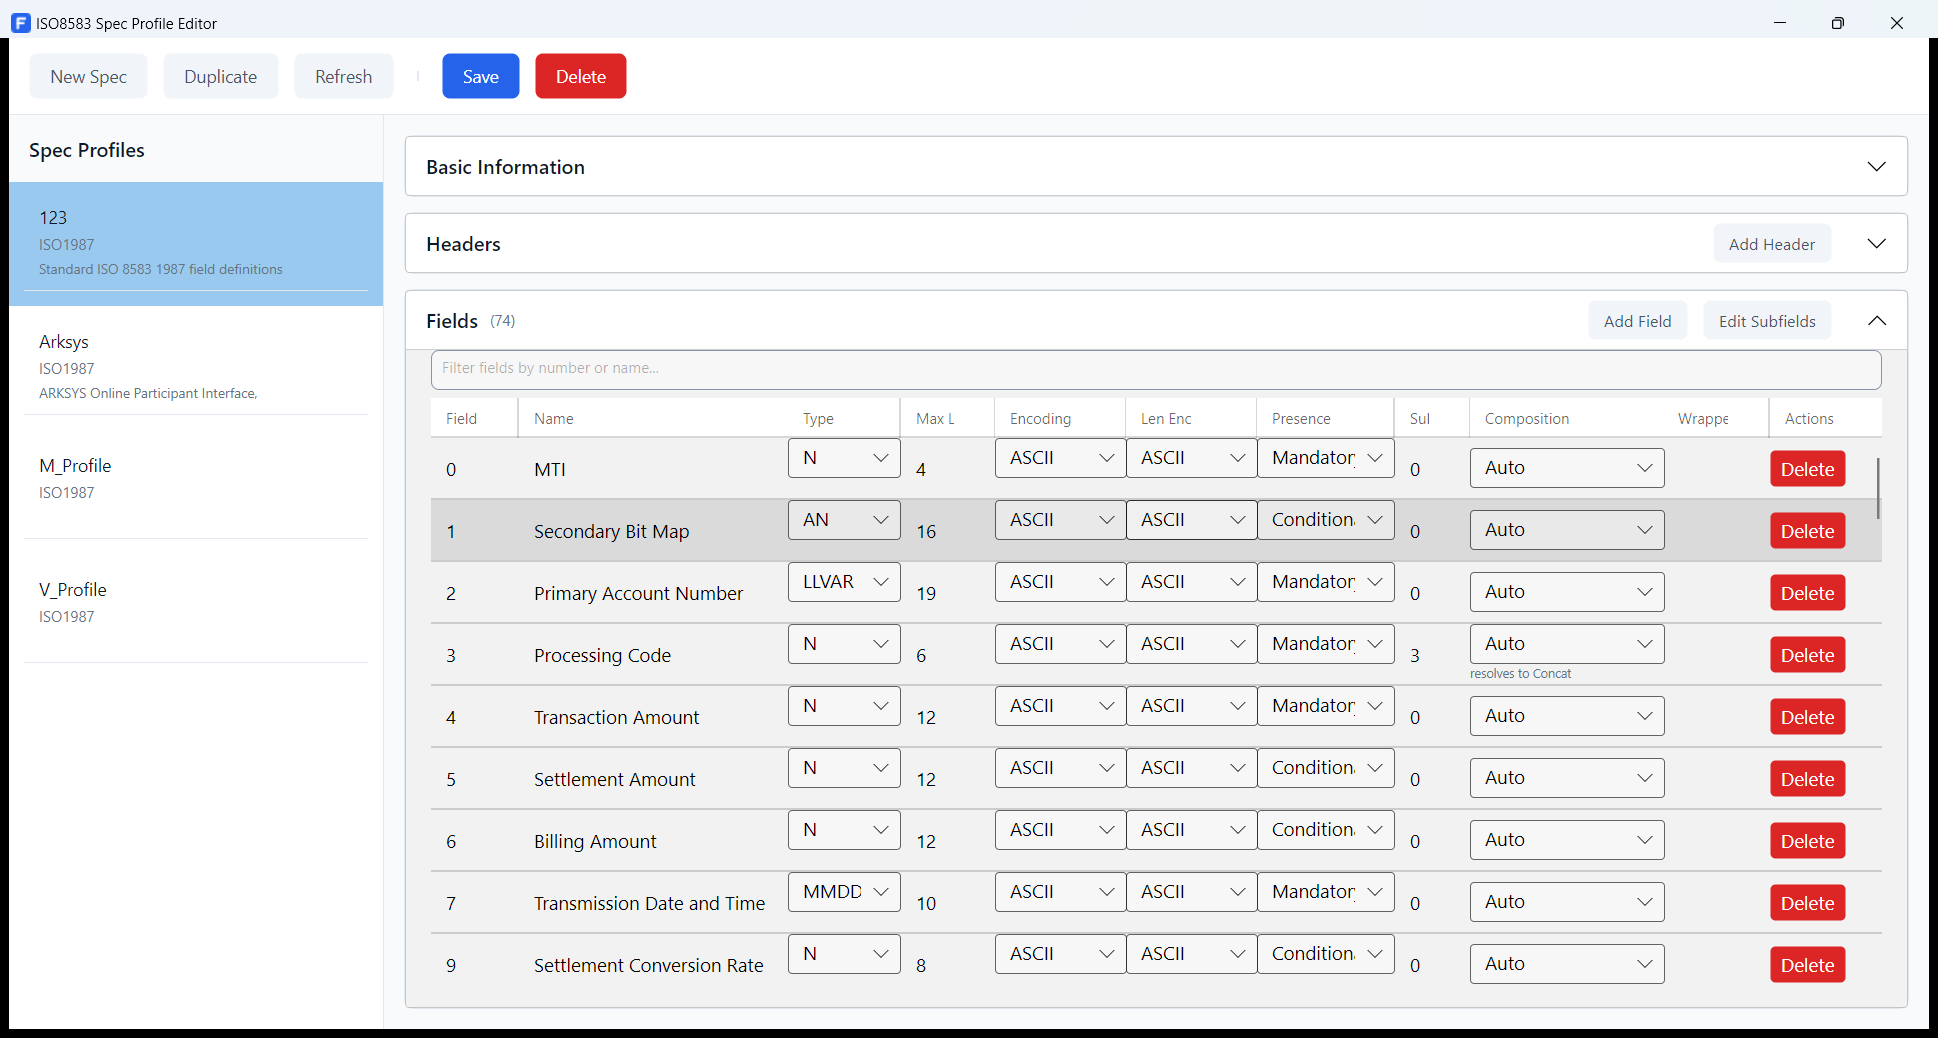
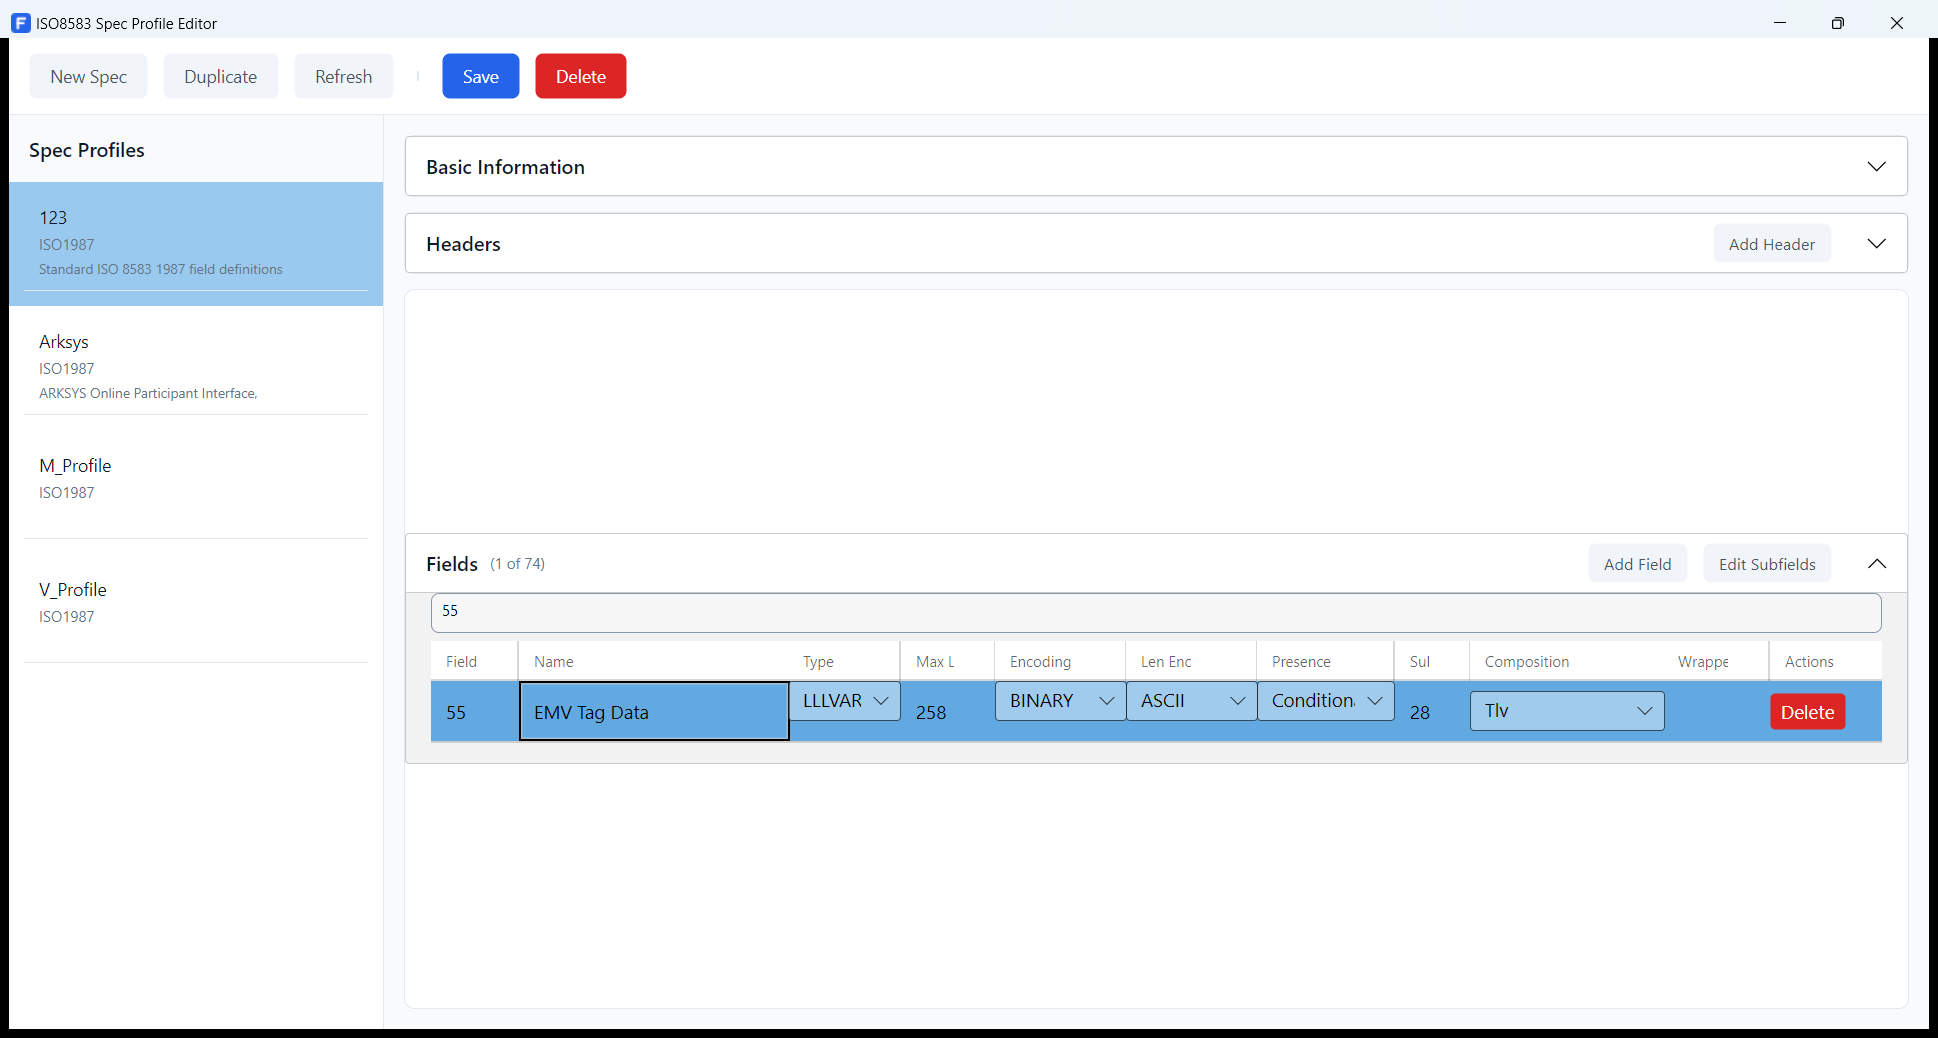
55. The heading counts
what the filter left (Fields (1 of 74)). Filtering only changes what
is shown — saving, adding and deleting still act on the whole profile.| Column | Meaning |
|---|---|
| Field # | The data element number. 0 is the MTI. |
| Name | What the field is called in the editors and in the parsed log. |
| Type | The data type and variability: N, AN,
ANS, B for fixed-length fields; LLVAR,
LLLVAR for variable ones. |
| Max Len | The length of a fixed field, or the cap on the content of a variable one. The length prefix is added on top — it is not counted here. |
| Encoding | How the content goes on the wire: ASCII, EBCDIC or BINARY. |
| Len Enc | How the length prefix of a variable field is written. |
| Presence | Mandatory, Conditional or Optional. Advisory — it does not stop you sending. |
| Subs | How many subfields the field has. |
| Composition | How those subfields are turned into the field's value — see section 14. |
| Wrapper | An optional extra TLV tag wrapped around the whole composed result. |
Changing a profile changes how every message under it is built and parsed, including every existing test case. It also means the application stops updating that profile for you: FlexSim refreshes shipped profiles when a new version brings a correction, but it never overwrites one you have edited. If you want to experiment, use Duplicate and work on the copy.
Installing a newer version of FlexSim does not touch your cards, keys, suites or test cases — but it does reconcile the shipped spec profiles, because a fix to a profile is a fix to the product. On the first start of a new version:
| Situation | What happens |
|---|---|
| Your copy matches what shipped | Nothing, silently. |
| The shipped profile changed and you never edited yours | Yours is refreshed in
place. The previous definition is written to a SpecBackups folder
first. |
| The shipped profile changed but you edited yours | Your version is kept. A warning in the log names the profile. |
| A profile you do not have | Added. |
| A profile you created yourself | Never touched. |
| A profile dropped from the new version | Never deleted — your test cases may still point at it. |
A refreshed profile keeps its identity, so every suite, test case and log row that pointed at it still does. Renaming is never done either: a profile you know as EBC stays called EBC even though newer installations call the same profile 123.
Some data elements are not a single value but a structure: DE-55 is a string of BER-TLV tags, DE-57 in the NPS profile is a counted token buffer, DE-106 is a nested TLV tree. In FlexSim these are described as subfields, and the field's value is composed from them.
Select a field in the spec editor and press Edit Subfields.
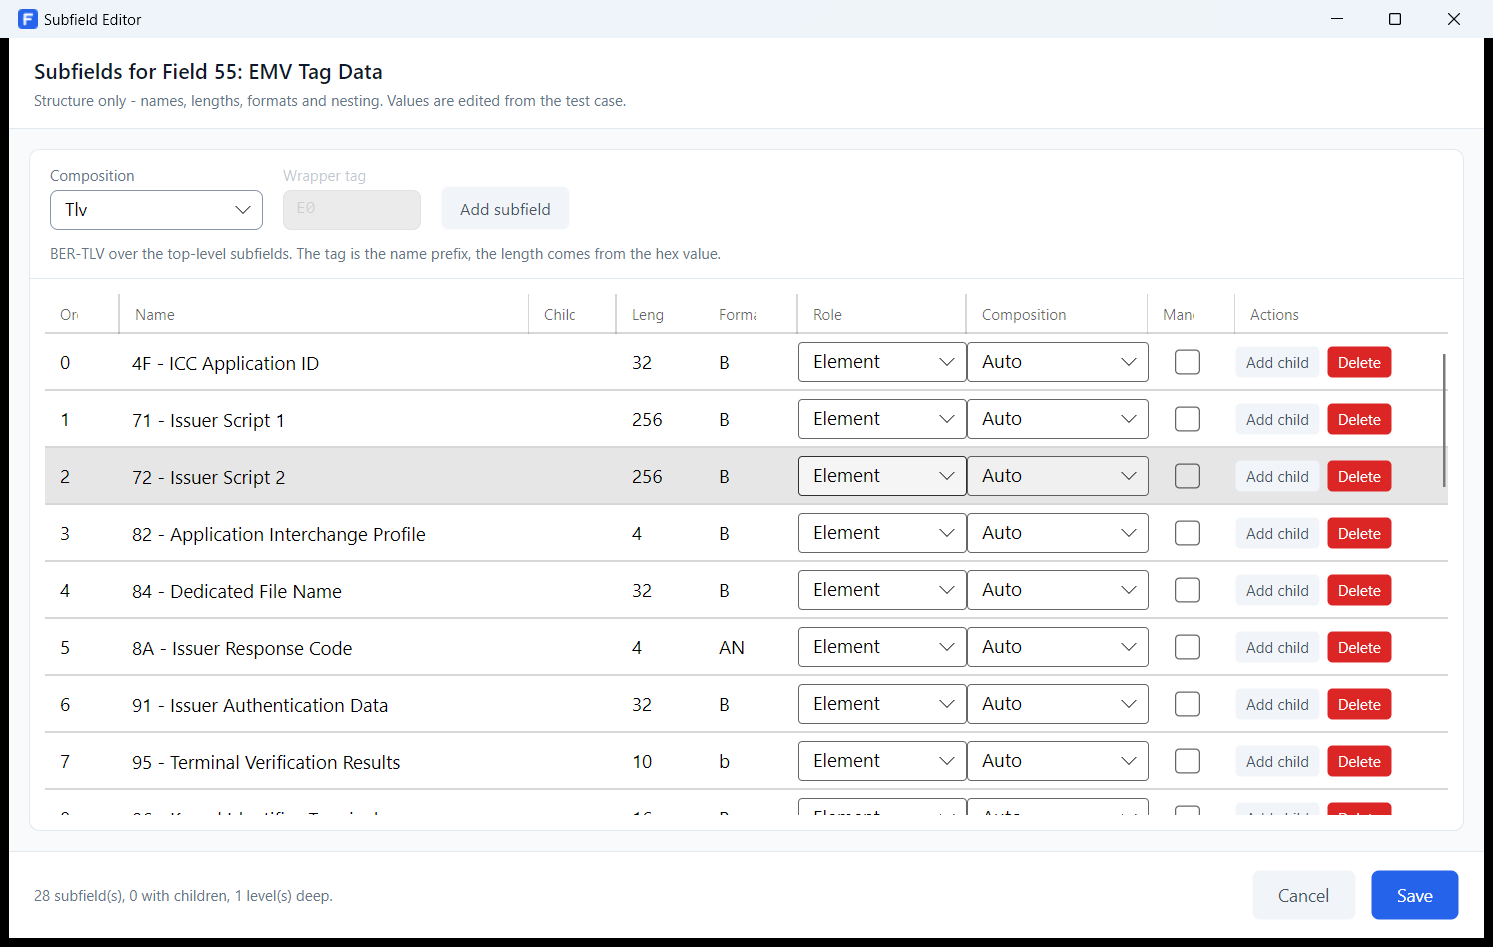
The Composition dropdown at the top says how the children are turned into the parent's value. It is declared, never guessed from the field number.
| Composition | What it does |
|---|---|
| Auto | The default, and a guess: TLV if the field looks like TLV, otherwise plain concatenation. It exists so that profiles written before composition was configurable keep behaving as they did. The Resolves to column in the spec editor shows what it works out to. Set the field explicitly and the guess is bypassed. |
| Concat | Join the child values exactly as entered. |
| Fixed | Positional. Each child is padded or truncated to its declared length — numeric and binary right-justified and zero-filled, everything else left-justified and space-filled. |
| Tlv | BER-TLV over the immediate children. This is what DE-55 uses. |
| NestedTlv | BER-TLV, recursing into children that are themselves containers.
An optional wrapper tag wraps the whole result — DE-106 uses
E0. |
| TokenBuffer | A counted buffer: a buffer header, then for each element an element header followed by its body. This is what NPS DE-57 uses. |
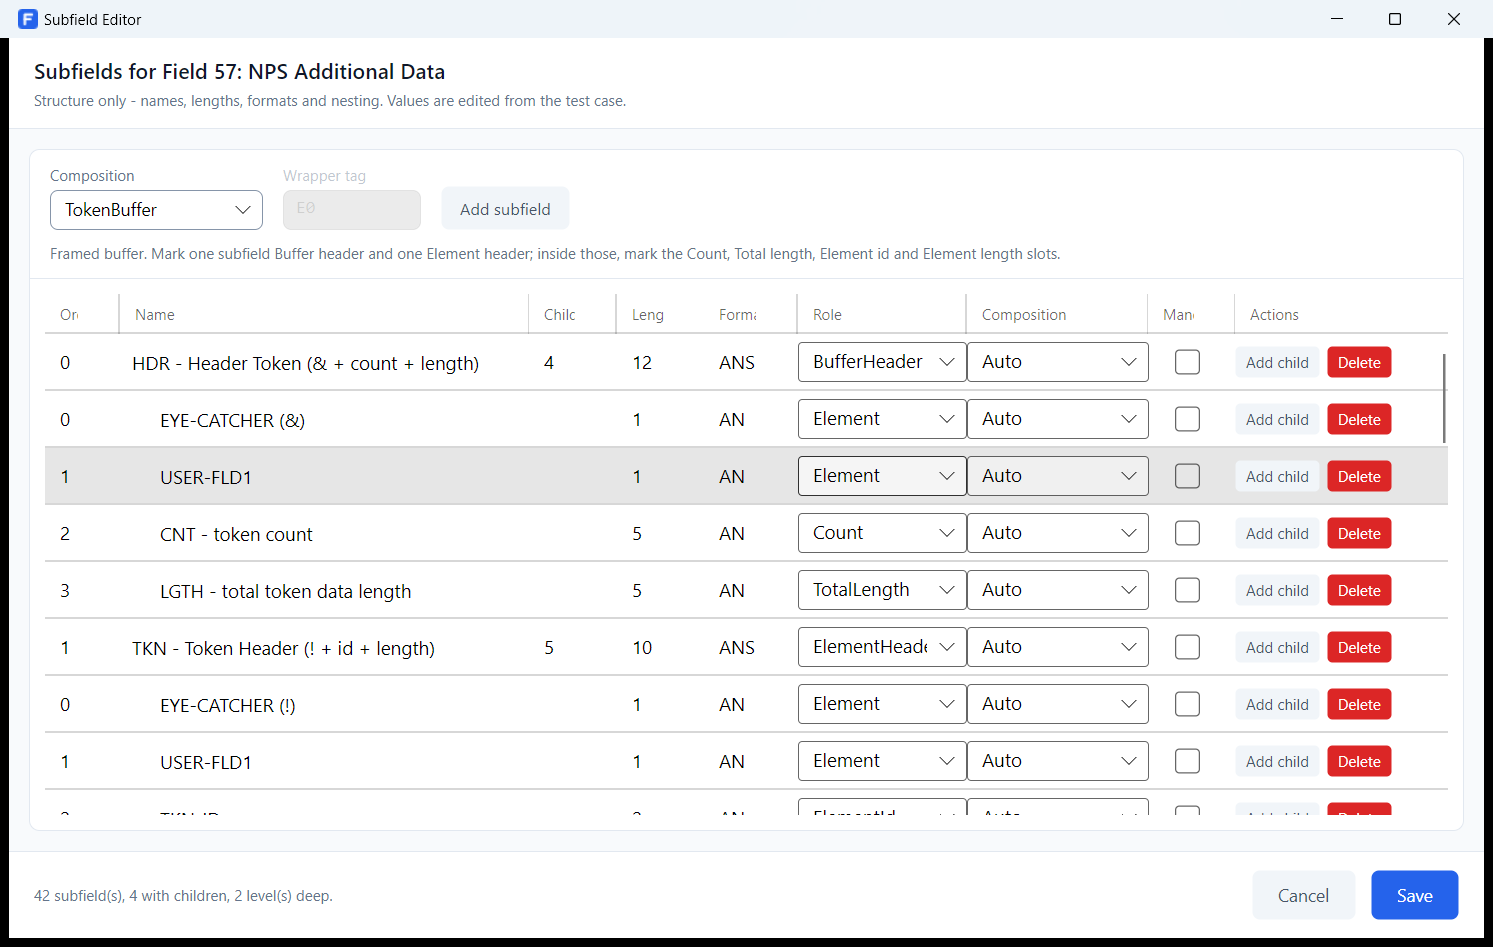
A child's Role says what it contributes. This is what keeps the framing declarative — nothing is hardcoded against a particular data element.
| Role | Meaning |
|---|---|
| Element | The default. Ordinary data. |
| BufferHeader | The template for the header at the front of the whole buffer. |
| ElementHeader | The template for the header in front of each element. |
| Count | A slot the composer fills with the number of elements emitted. |
| TotalLength | A slot filled with the length of everything after the buffer header, element headers included. |
| ElementId | A slot filled with the current element's identifier. |
| ElementLength | A slot filled with the current element's length. |
Subfields nest to any depth. A subfield that has children is a container: its value is composed from what it holds and cannot be typed directly. The grid shows the tree flattened and indented, and every row has its own Add child button.
Composition inherits: a child left on Auto takes NestedTlv under a NestedTlv parent, and Fixed under a TokenBuffer — so a profile declares it once at the top rather than on every element.
In a token buffer, an element with no value is omitted rather than sent as padding, and the count and total length follow what was actually emitted.
Subfield Editor (this one, reached from the spec profile editor) edits the structure of a profile's subfields. Subfields (reached from a field's Edit… button in the test case editor) edits the values of one test case. See section 18.
A test case is one message. This part covers where it lives, how each field gets its value, and how to say what a good reply looks like.
A suite is a named folder of test cases belonging to one spec profile. Right-click in the tree and choose Add Test Suite.
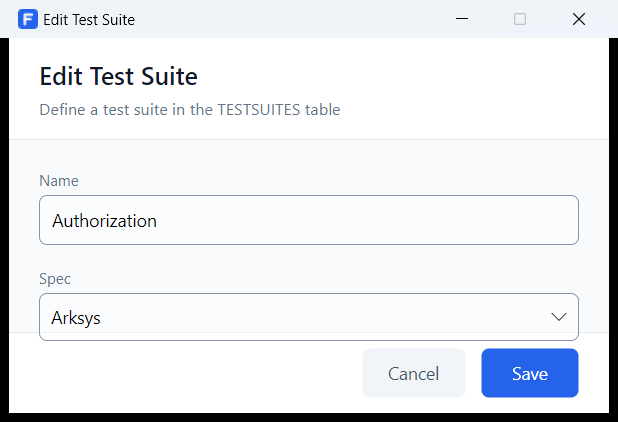
Suites are worth organising by intention rather than by message type — Network, Authorization, Financial, Reversals, Negative cases. Order matters in one specific place: when a suite is used as a set of responder rules, the rules are tried in the order the test cases sit in (section 23).
Deleting a suite deletes the test cases inside it. There is no undo.
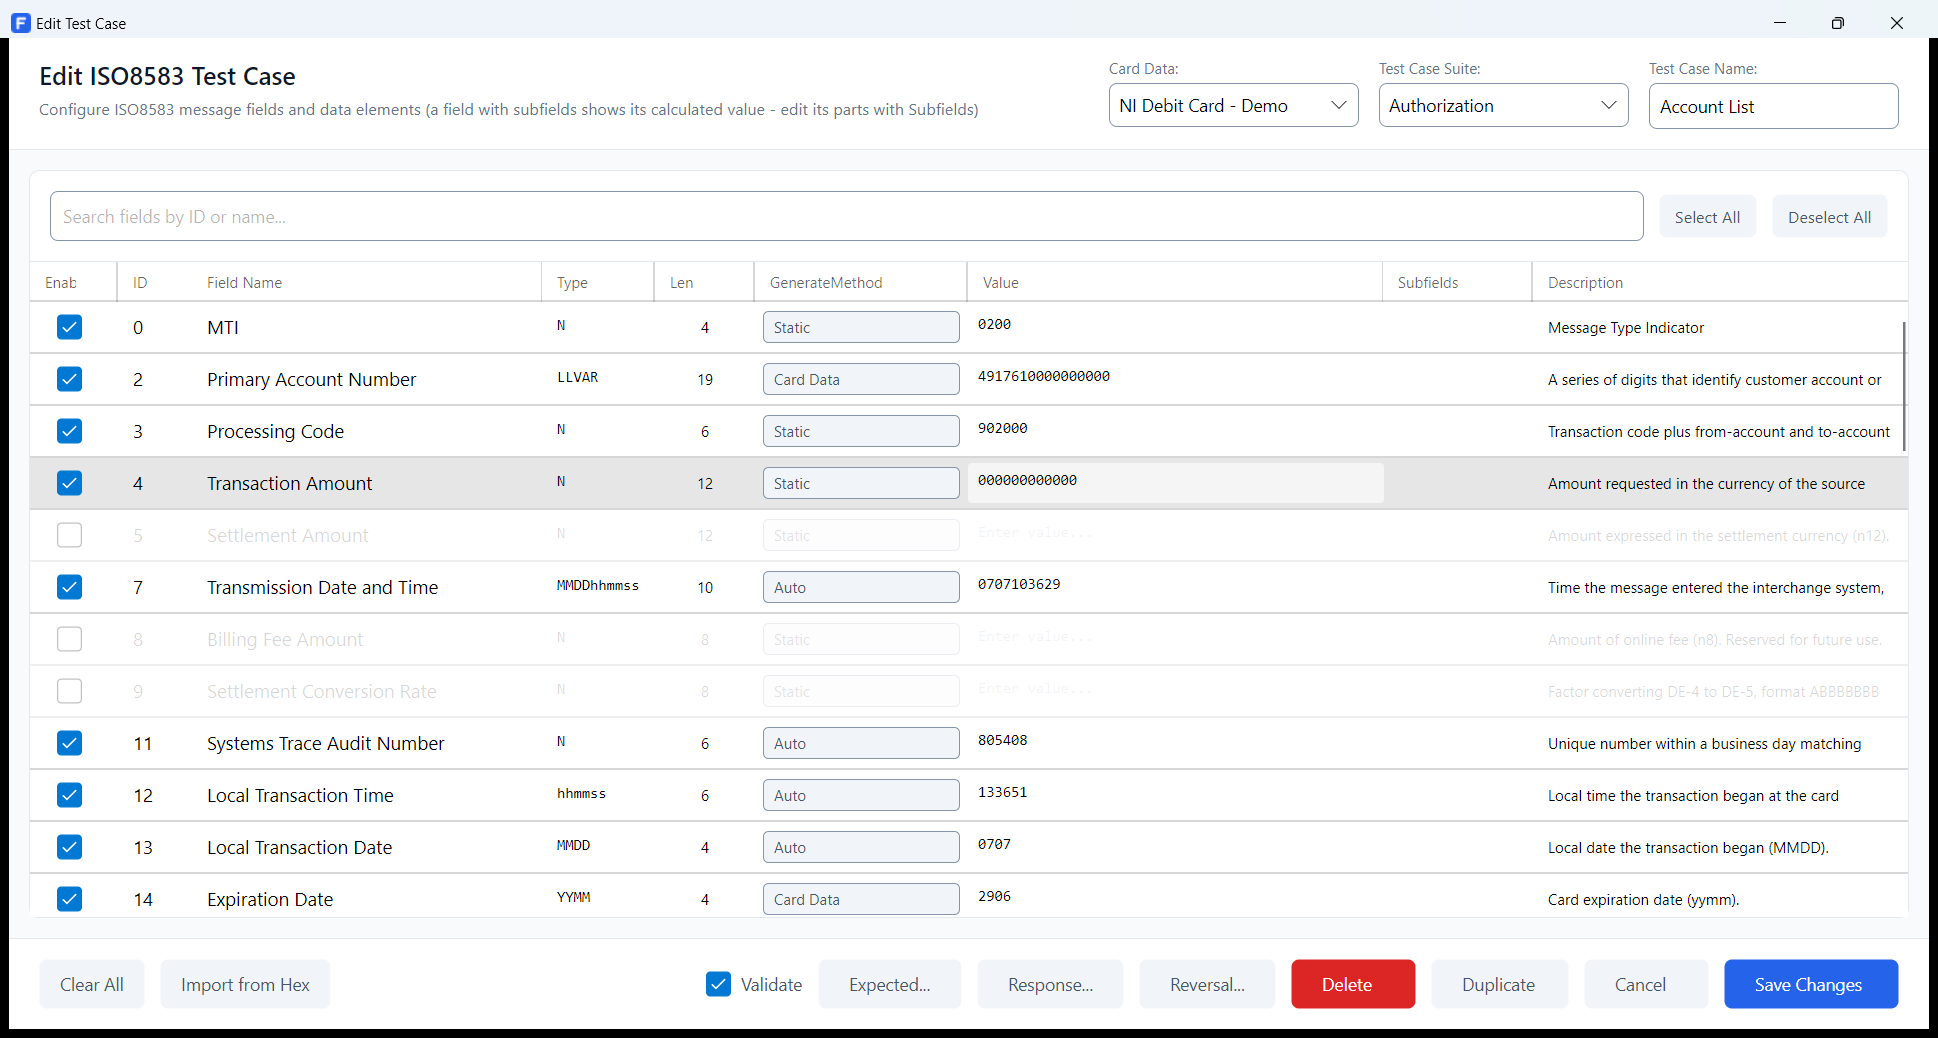
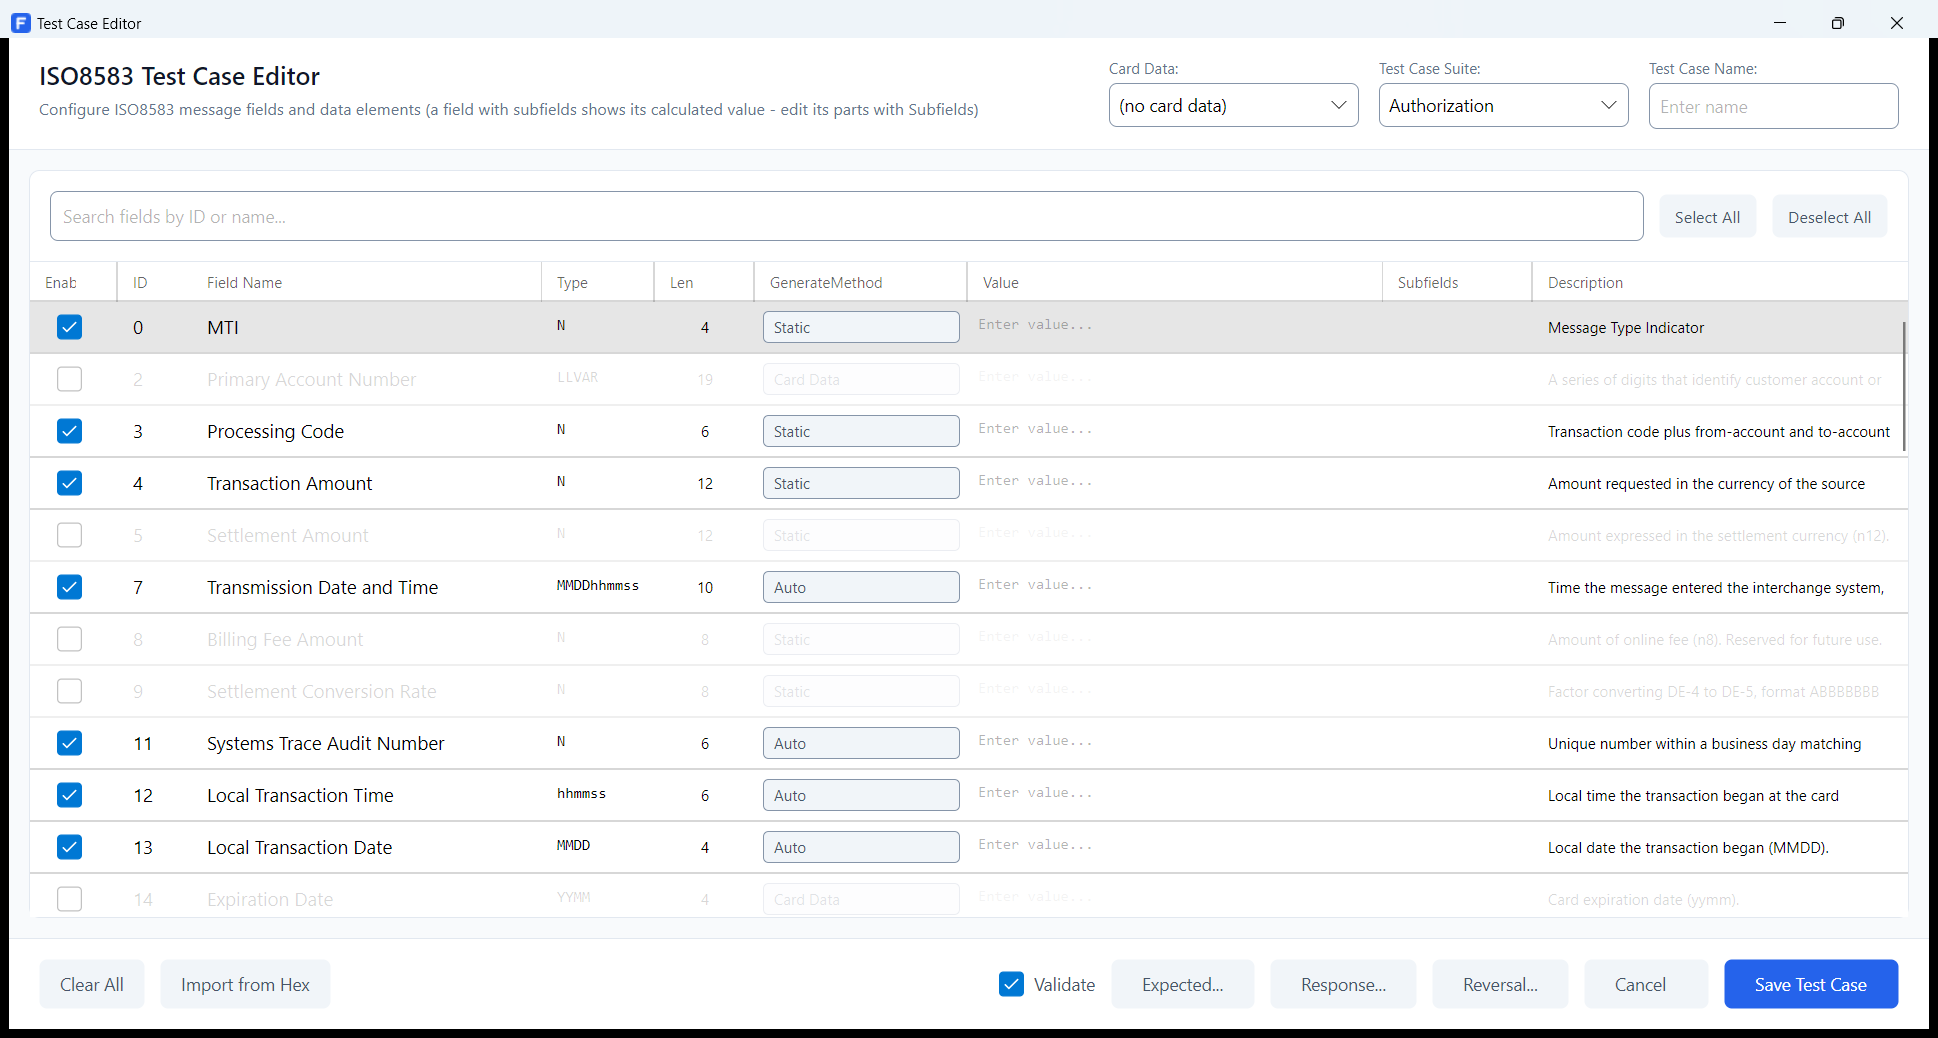
Double-click a test case in the tree to open it, or press New Test for an empty one.
| Control | Meaning |
|---|---|
| Card Data | The card profile this test case draws values from. Fields set to Card Data read from it, and it is the card whose keys are used for cryptograms. |
| Test Case Suite | Which suite the case belongs to. Changing it moves the case. |
| Test Case Name | What it is called in the tree and in the log. |
| Column | Meaning |
|---|---|
| Enable | Tick to include the field. The ticks are exactly what the message's bitmap will say. |
| ID / Field Name | The data element, from the active spec profile. |
| Type / Len | The type and length the profile declares. Read-only here — change them in the spec editor. |
| GenerateMethod | Where the value comes from. See section 17. |
| Value | The value itself. For a field with subfields this shows the composed result and cannot be typed into. |
| Subfields | An Edit… button on fields that have subfields. |
| Description | The profile's description of the field. |
Above the grid, the search box filters by field number or name, and Select All / Deselect All tick and untick everything. Filtering only changes what is shown — it never changes what is ticked.
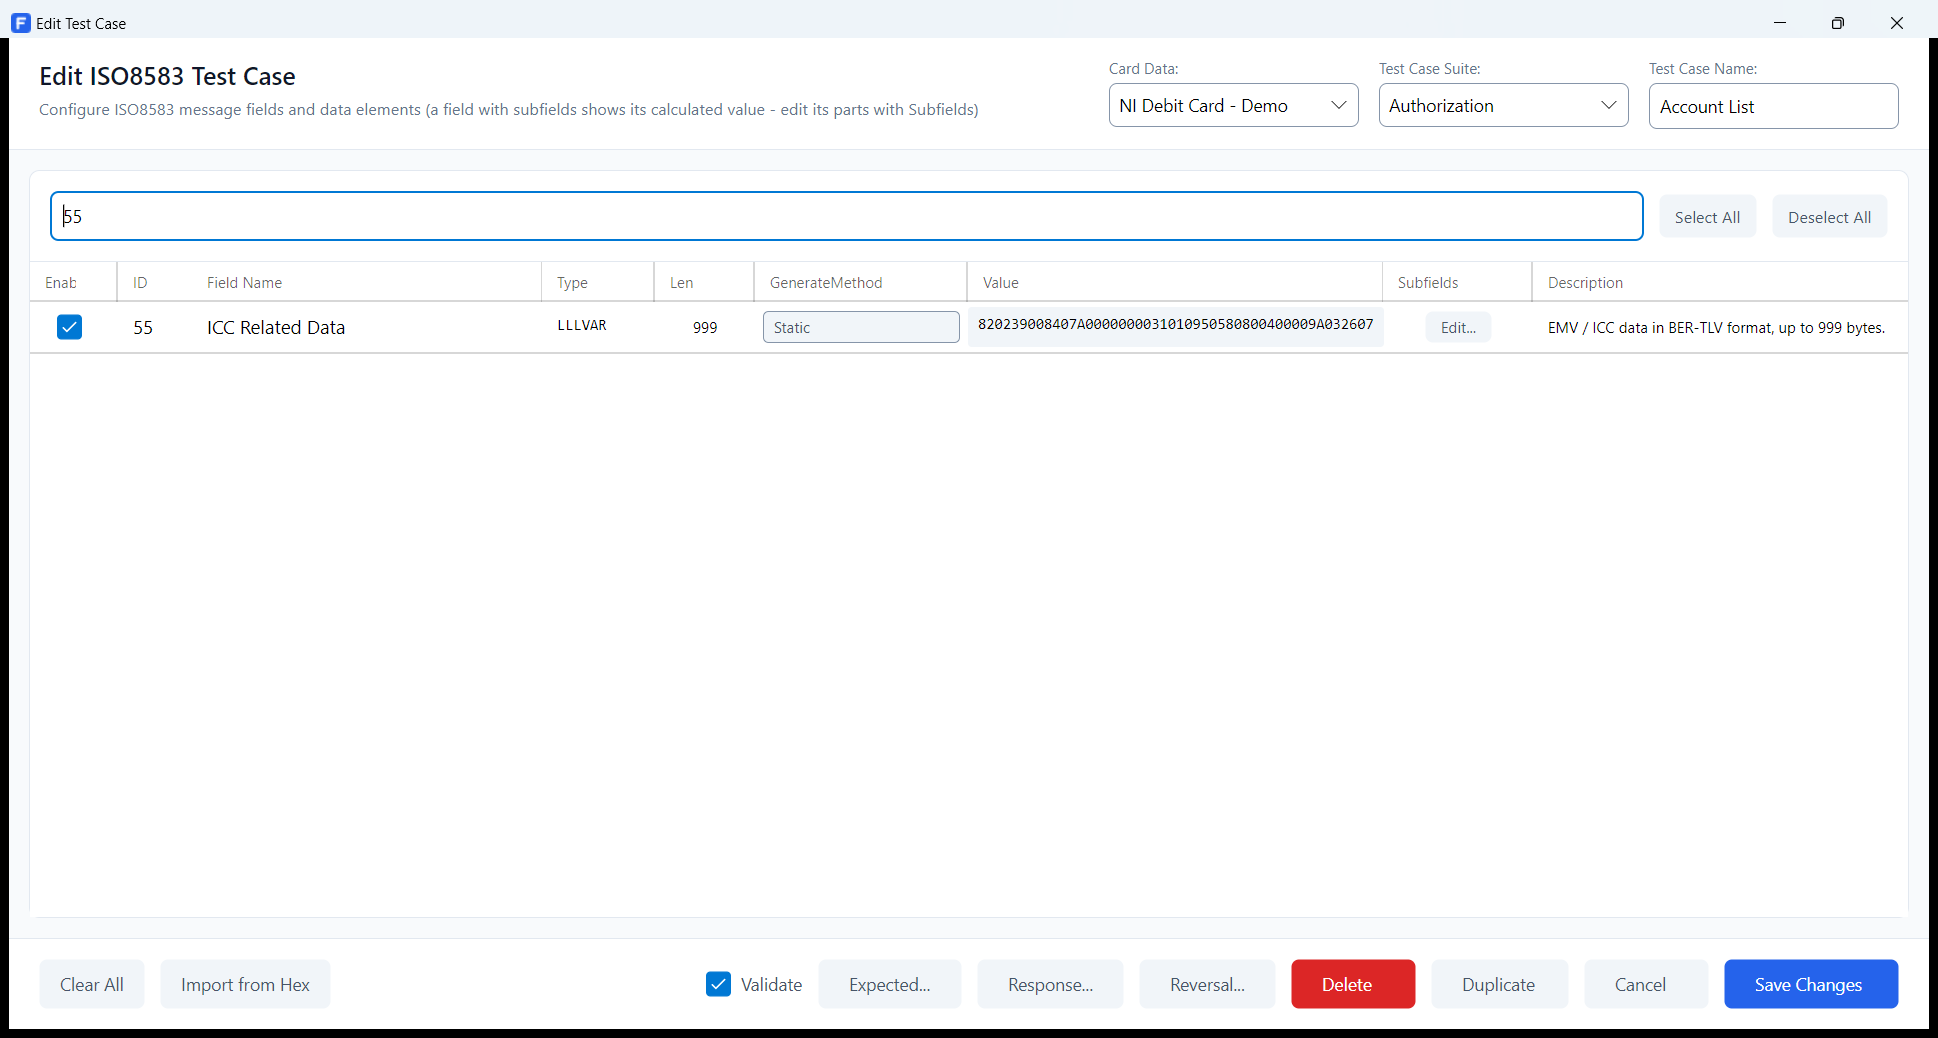
| Control | What it does |
|---|---|
| Clear All | Empties every value. |
| Import from Hex | Fills the whole screen from a captured message — see section 19. |
| Validate | Whether this case's reply is judged at all. Off, the case still runs and still sends; its reply is simply not checked. |
| Expected… | The rules the reply must satisfy — see section 20. Disabled when Validate is off, but the rules are kept. |
| Response… | The reply this case sends when it is answering an incoming request — see section 23. |
| Reversal… | The reversal this case sends once its request has been answered — see section 24. |
| Duplicate | Copies the case, subfields and all. The usual way to make a variant. |
| Delete / Cancel / Save Changes | As they read. Cancel discards everything since the window opened. |
The GenerateMethod on each row decides where the value comes from when the message is built. This is the single most important idea in the editor: a value typed into a row is only used if the method says to use it.
| Method | Behaviour |
|---|---|
| Static | Send exactly what is in the Value box. The default, and the right answer for most fields. |
| Auto | Generate a value at send time. For an ordinary field this means random content of the right type and length. For dates, times and EMV tags it means the correct value — see below. |
| Card Data | Read the value from the linked card profile. DE-2 takes the PAN, DE-14 the expiry, DE-23 the card sequence number, DE-35 track 2, DE-52 the PIN block. You can also pick a specific card item rather than letting the field number decide. |
| Echo from request | Copy the same field number out of the incoming message. Used by the responder and the reversal editor; it is deliberately absent from the request editor's menu, because a request has nothing to echo. |
| Copy from request field | Copy a different field number out of the original request. This is what a reversal's original-data elements are made of. Reversal editor only. |
| Where | Value |
|---|---|
| Any plain field | Random content sized to the field: digits for N,
alphanumerics for AN, alphanumerics and spaces for ANS. |
| EMV tag 9A | Today's date, YYMMDD. |
| EMV tag 9F21 | The current time, HHMMSS. |
| EMV tag 9C | The first two digits of DE-3. |
| EMV tag 9F02 | Mirrors DE-4. |
| EMV tag 9F36 | The application transaction counter, four hex digits, stepped
on each use and wrapping FFFF to 0001. Needs a linked
card. |
| EMV tag 9F26 | The ARQC, computed from the card's AC key. Needs a linked card with an AC key. |
| Any other EMV tag | Random hex sized to the tag. |
Plain fields are resolved before composite ones, so 9F02 and 9C can read the DE-4 and DE-3 values that were just produced. Anything that could not be produced — an ARQC with no card, a Copy with no source picked — is left out and logged, never sent empty.
Any value can contain placeholders, substituted when the message is built. They work with Static, so you can mix fixed text and generated parts.
| Placeholder | Becomes |
|---|---|
{{DATE}} | Now, as MMDDhhmmss |
{{TIME}} | Now, as hhmmss |
{{YYYYMMDD}} | Today, as yyyyMMdd |
{{STAN}} | A random six-digit trace number |
{{CARD.PAN}} | The linked card's PAN |
{{CARD.EXPIRY}} | Its expiry |
{{CARD.TRACK2}} | Its track 2 |
{{CARD.CVV}} | Its CVV |
{{CARD.PVV}} | Its PVV |
{{CARD.PVKI}} | Its PVKI |
A field with subfields shows its composed value in the grid and cannot be typed into. Press Edit… in its Subfields column to open the values window.
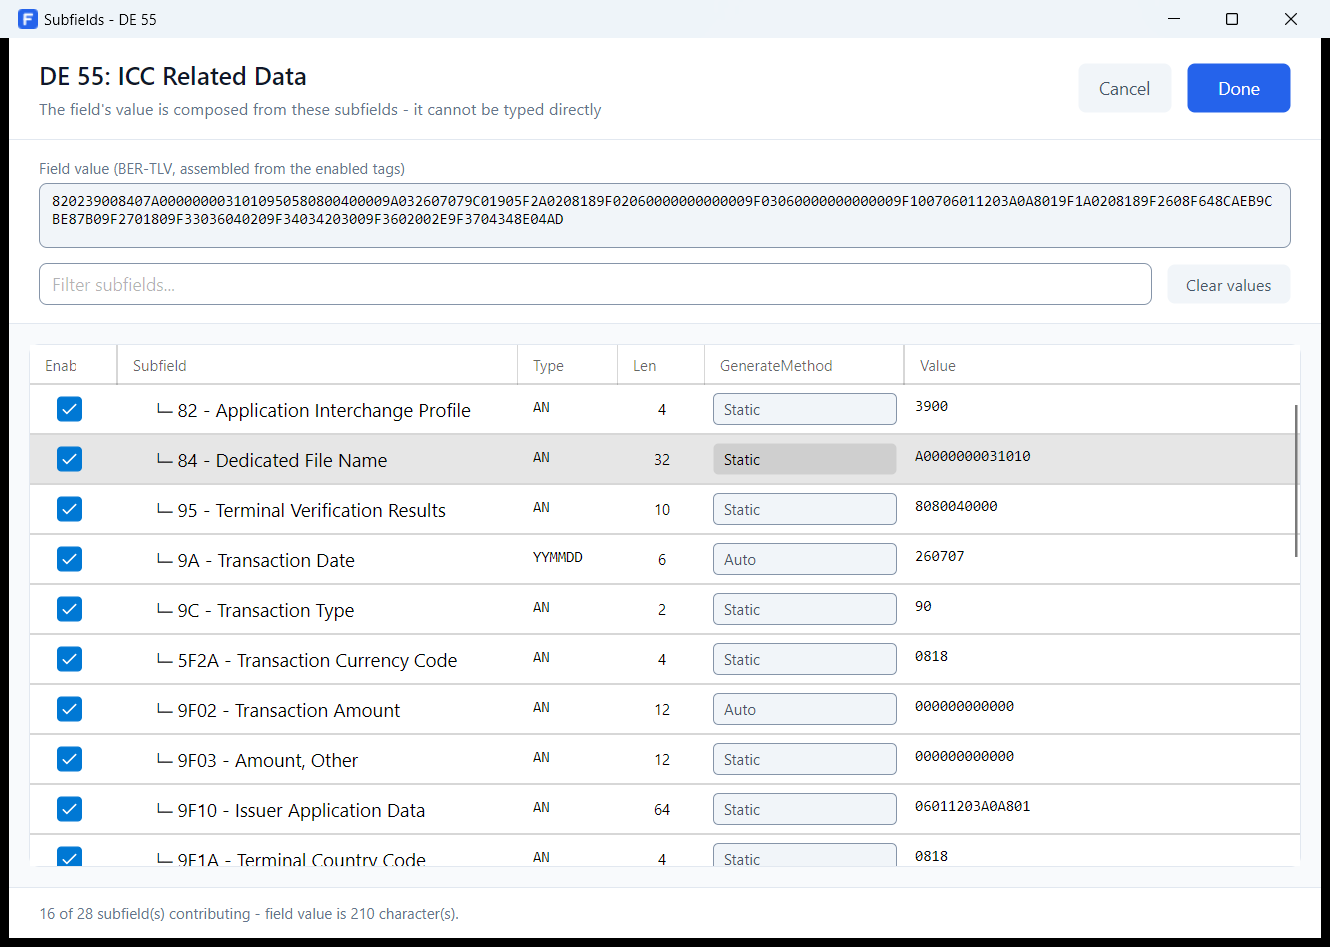
The Len column for an EMV tag counts hex characters, which is twice the byte count. A tag documented as 8 bytes shows as 16.
Instead of ticking fields one at a time, you can paste a message captured from the wire and let FlexSim take it apart. Import from Hex is available on the request, response and reversal screens.
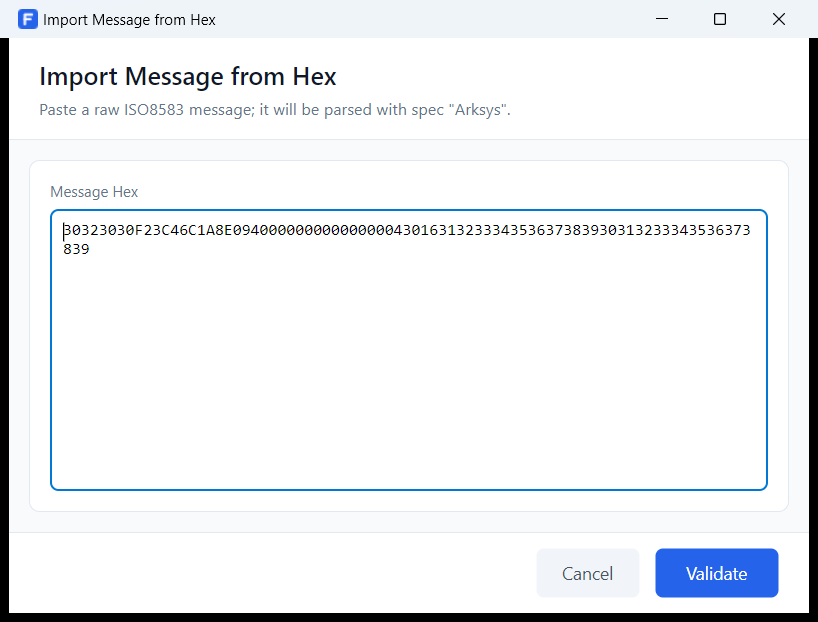
The message is parsed with the active spec profile, and the import then:
On the response and reversal screens every imported field is pinned to Static, subfield leaves included. A capture is what was on the wire; a field left on Echo, Copy, Auto or Card Data would throw the captured value away and produce a different one. On the request screen the methods are left alone, because there a field's method is a choice you make alongside its value.
Expected… defines what a good reply looks like. Every rule must hold for the case to pass.
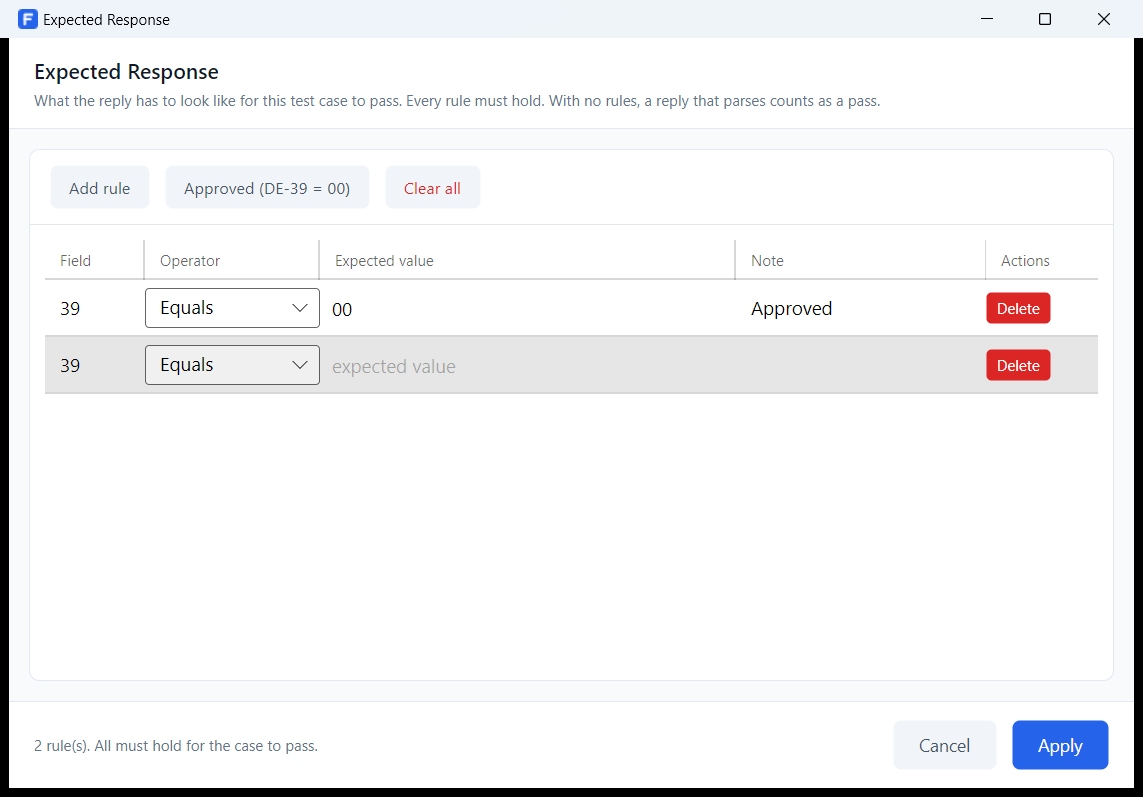
| Operator | Passes when the field… |
|---|---|
| Equals | matches the expected value exactly |
| NotEquals | differs from it |
| Contains | contains it anywhere |
| StartsWith | begins with it |
| Regex | matches the expected value read as a regular expression |
| Present | is in the reply at all (no expected value needed) |
| Absent | is not in the reply (no expected value needed) |
The Note column is free text and appears in the result, so it is worth saying why the rule exists rather than restating it.
With no rules at all, a reply that parses counts as a pass. That is deliberate — failing every unconfigured case would report nothing useful. If you do not want a case judged, untick Validate instead; the rules you have are kept for when you switch it back on.
Getting a message onto the wire, reading what came back, and answering requests instead of sending them.
Press Connect. In client mode FlexSim dials the host and port from the Connection window; in server mode it starts listening. The status bar reports the result.
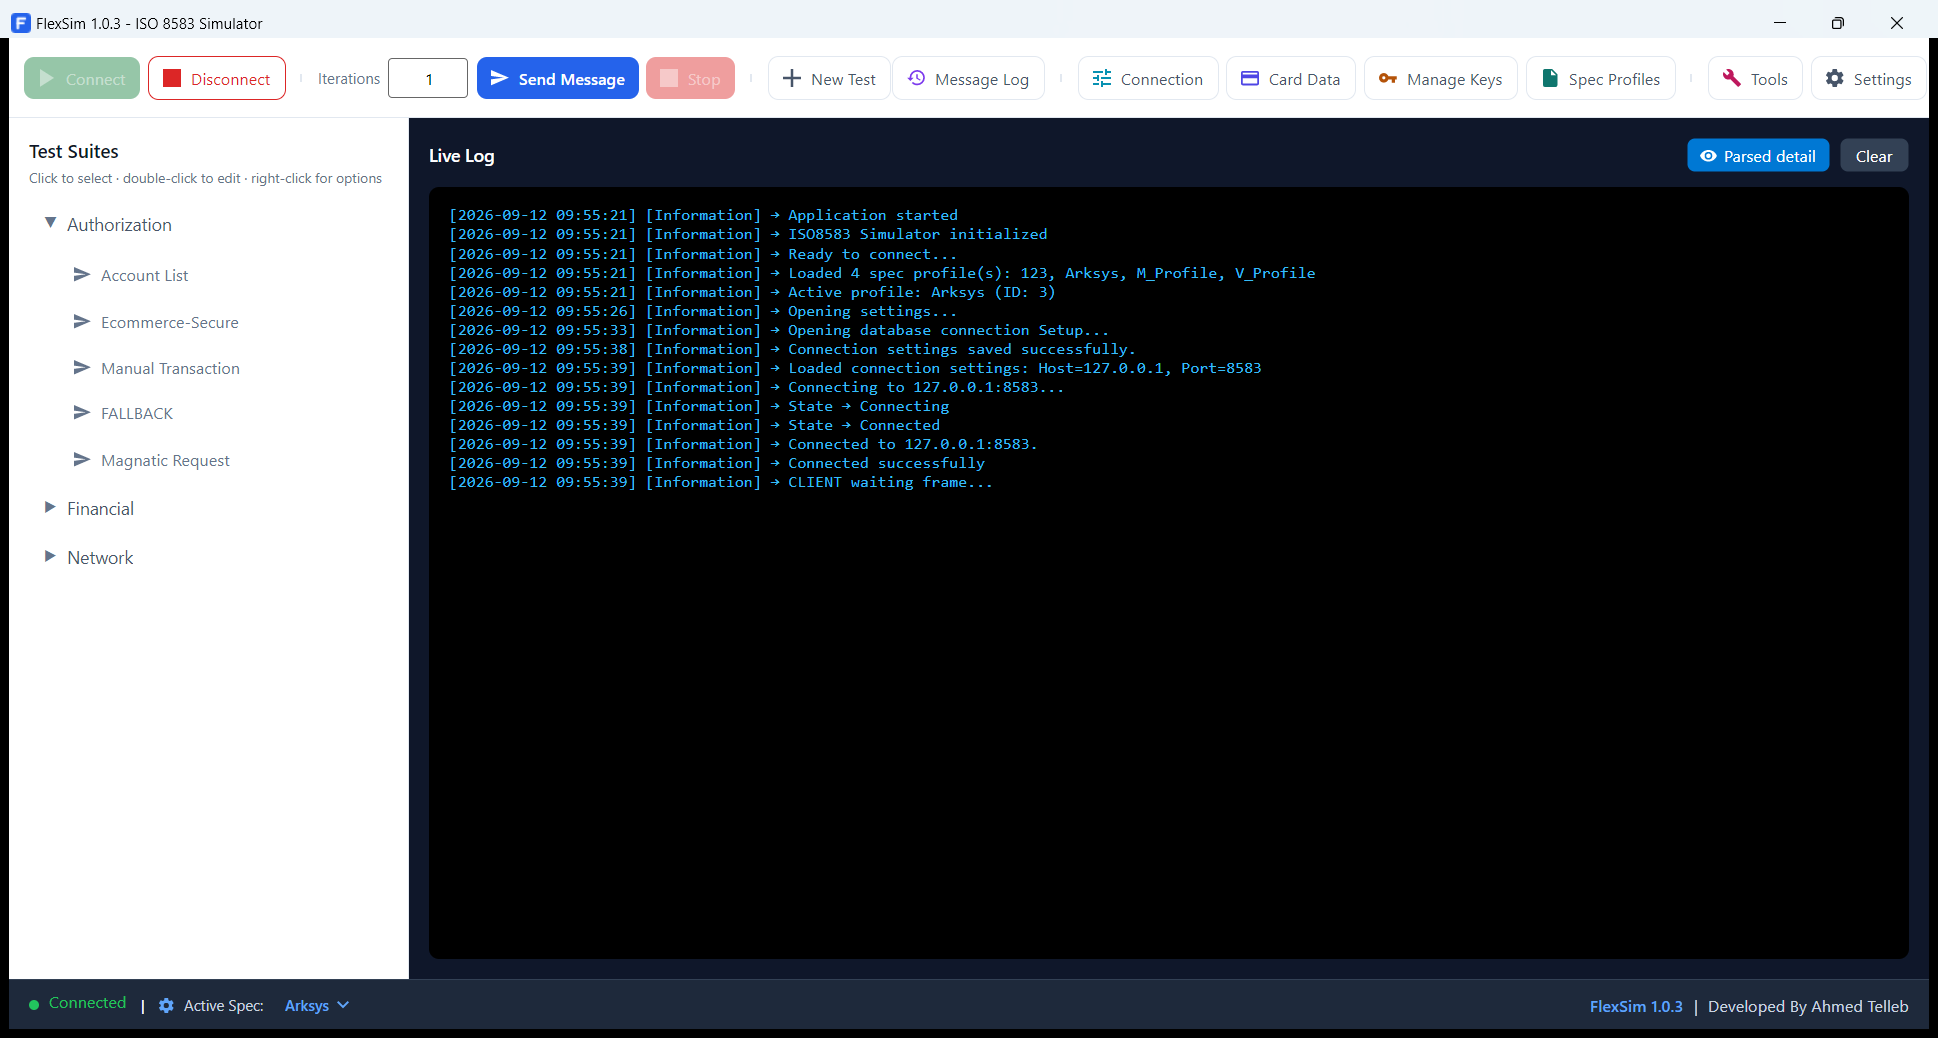
Select a test case in the tree and press Send Message, or Ctrl+Enter. What happens next, in order:
Set Iterations above 1 to repeat. Each send waits for its reply before the next one goes out, and a timeout stops the run. Stop ends it after the message currently in flight.
Each message in the log is written as a block: a heading line giving direction, MTI and byte count, then the hex, then the ASCII rendering, then — with Parsed detail on — every data element it carried. EMV tags inside DE-55 are listed with their tag numbers and names, indented under the field.
Warnings appear inline in the same stream, which is where to look when a field is missing from a message you expected it in. Typical lines say that an ARQC was requested with no card linked, that a Copy field had no source picked, or that a track could not be recomposed.
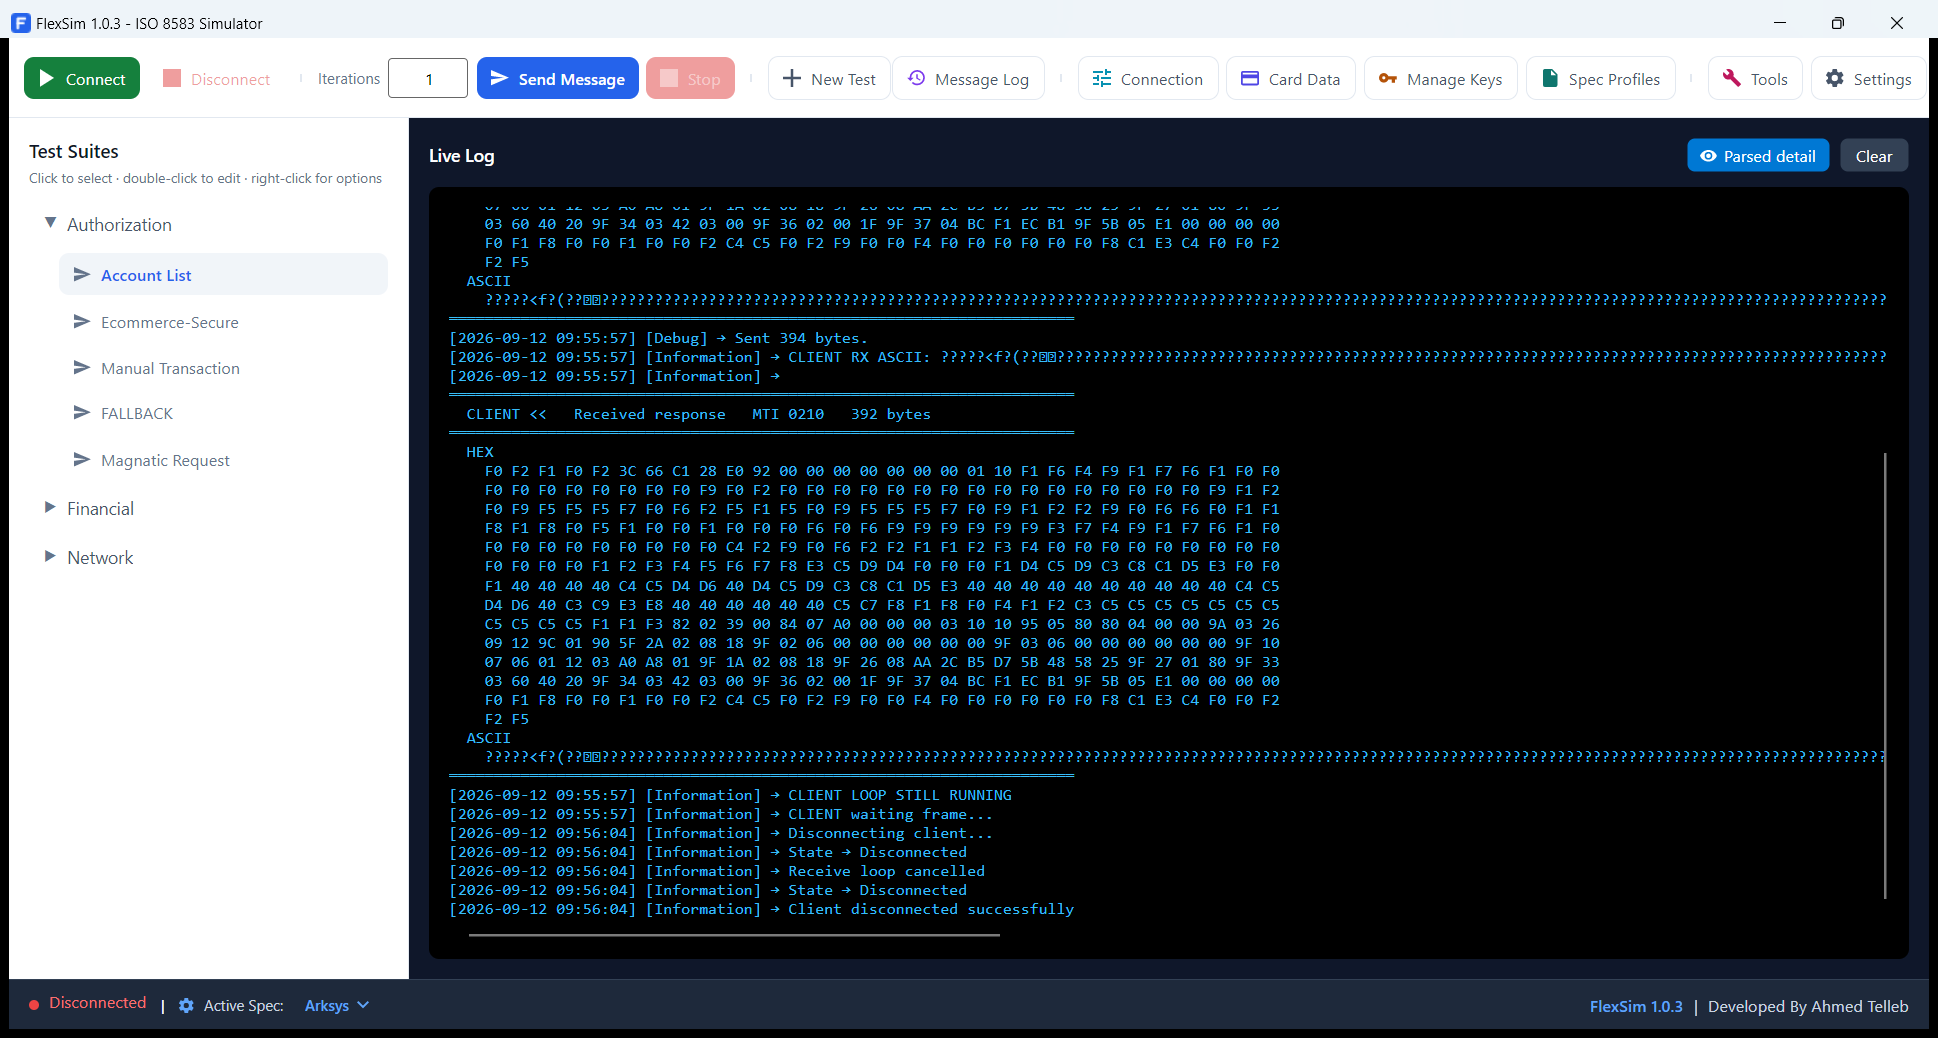
The live log is cleared whenever you press Clear or restart. The message log is the permanent record, kept in the database per spec profile.
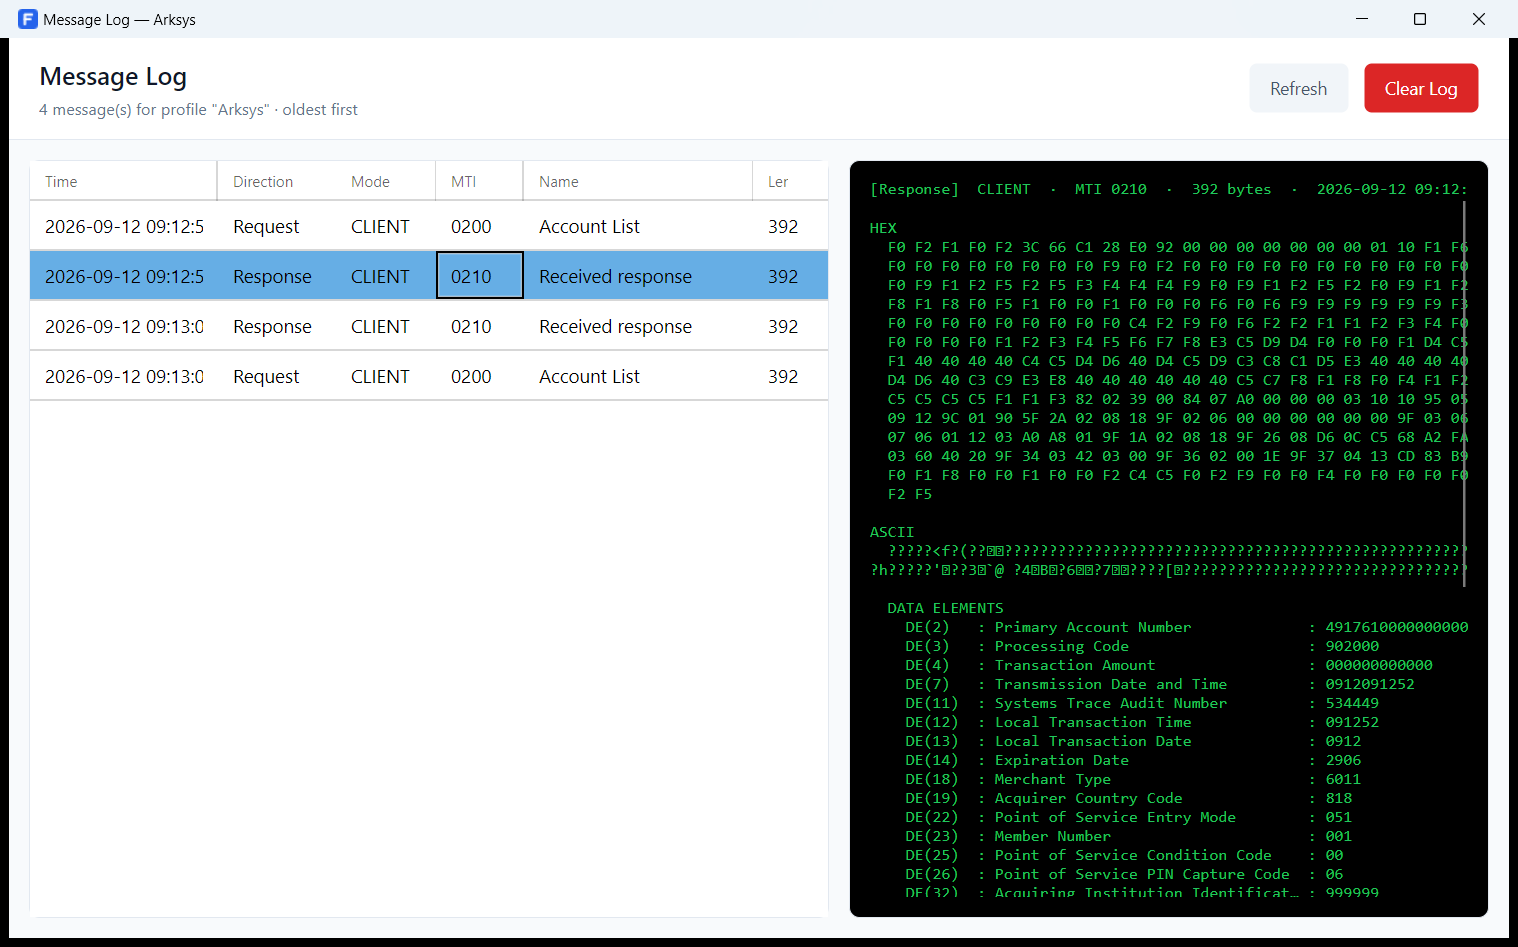
| Column | Meaning |
|---|---|
| Time | When it was sent or received. |
| Direction | Request or Response. |
| Mode | CLIENT or SERVER — which side FlexSim was. |
| MTI | The message type indicator. |
| Name | The test case name for a message you sent; for one received, what it was recognised as. |
| Len | The payload length in bytes, excluding the framing header. |
Refresh re-reads the list; Clear Log empties it for the current profile. The heading counts what is there.
Separately from this, everything in the live log is mirrored to a text file
(FlexSim-yyyyMMdd-NNN.log) in the Logs folder beside the database,
rolling at midnight and at the size limit you set in Settings.
A test case can answer requests instead of sending one. This turns FlexSim into a small host: the other side sends you a 0200, and you reply with the 0210 you defined.
Open a test case and press Response….
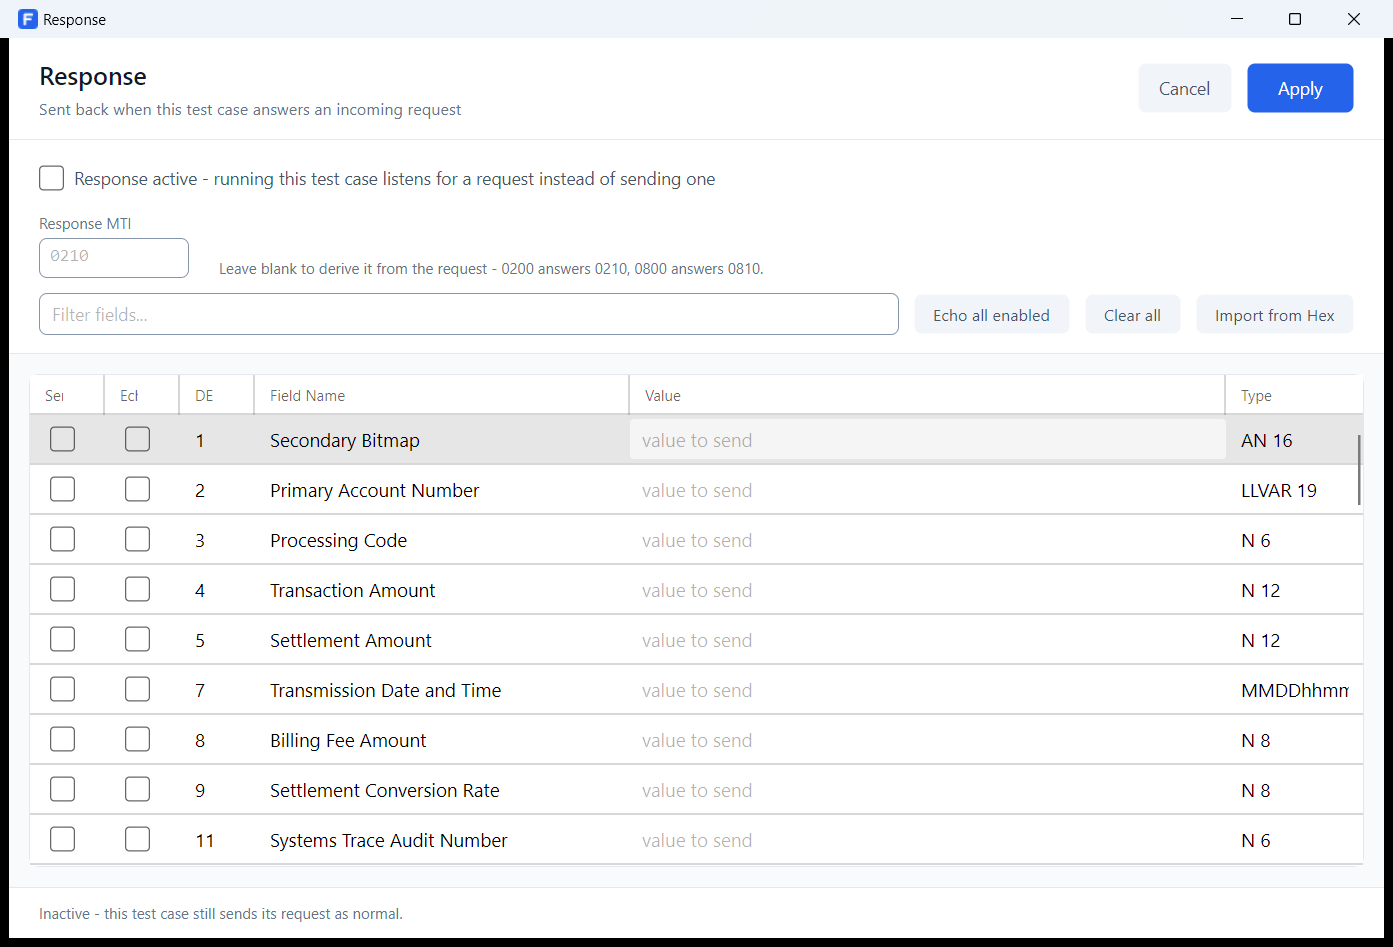
| Control | Meaning |
|---|---|
| Response active | Turns this test case into a responder. While it is on, running the case listens instead of sending. |
| Response MTI | The MTI to reply with. Leave it blank to derive it from the request — 0200 is answered with 0210, 0800 with 0810. |
| Send | Include this field in the reply, with the value in the Value column. |
| Echo | Copy this field from the incoming request. A field that is not in the request is left out rather than sent empty. |
| Echo all enabled | Sets every ticked field to Echo in one press — the quickest way to build a reply that mirrors the request. |
| Import from Hex | Fills the screen from a captured reply, everything pinned to a fixed value. |
Select a responder test case in the tree. Send Message is retitled Listen for Request, and Iterations becomes how many requests to answer before disarming.
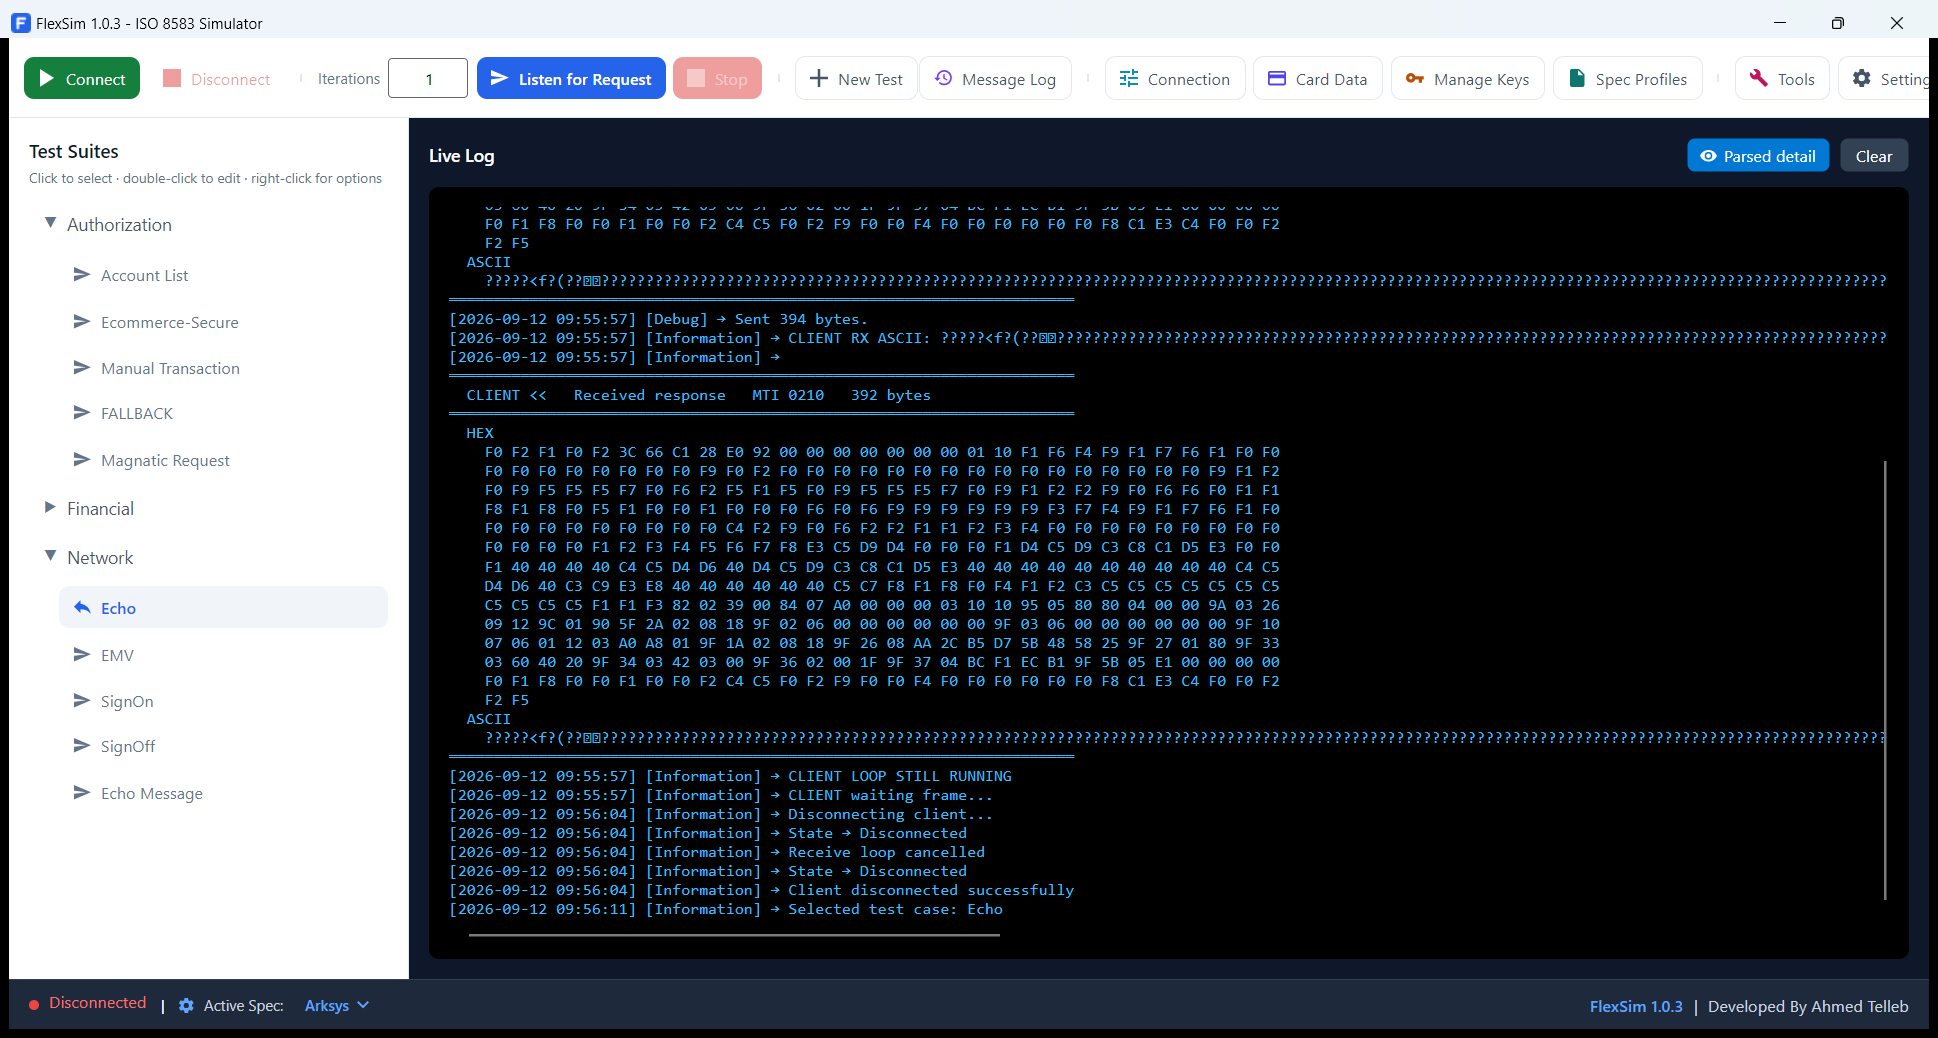
Arming does not load just the one test case — it loads every responder case in that suite as a rule, in the order they sit in. So a suite becomes a small host that answers different requests differently.
A response field with subfields is composed properly, so a reply can carry real BER-TLV in DE-55. Inside it, tag 91 set to Auto is filled with the issuer authentication data.
"00" becomes
3030. A literal four-hex value entered instead is passed straight through,
for a spec that really uses BCD.ARPC(8) ‖ ARC(2) and needs no CSU.
Method 2 produces ARPC(4) ‖ CSU(4), has no ARC of its own, and fails
loudly rather than guessing if the card has no CSU.How an issuer answers is a property of that issuer, not of each test case, so ARPC Method and CSU are card profile fields. Set them once in Card Data.
A test case can send a reversal automatically once its request has been answered. Press Reversal… in the test case editor.
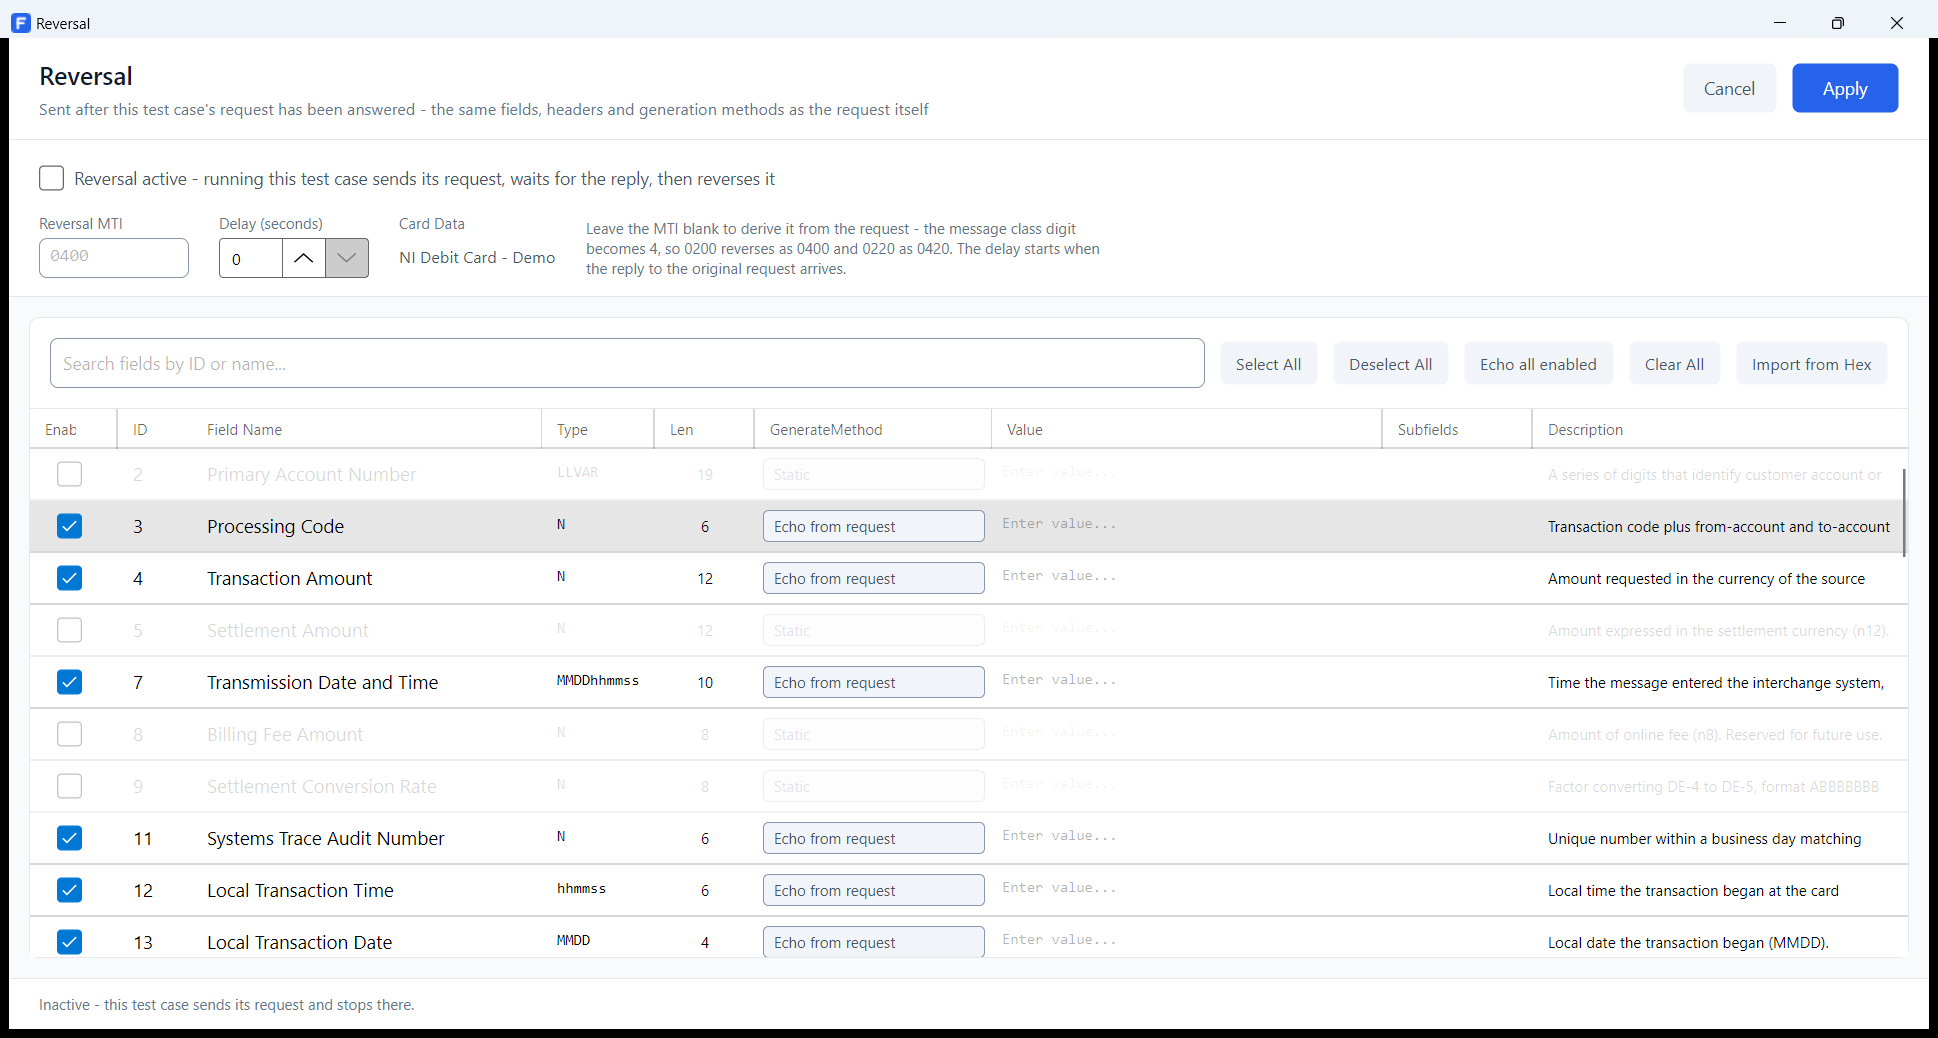
| Control | Meaning |
|---|---|
| Reversal active | Running this case sends its request, waits for the reply, then reverses it. |
| Reversal MTI | Usually 0400. Blank derives it from the
request. |
| Delay (seconds) | How long to wait after the reply before sending. 0 sends straight away. |
| Card Data | Read-only — the card linked to the test case. Card Data fields on the reversal read from it, exactly as on the request. |
| Echo all enabled | Sets every ticked field to Echo from request. |
| Import from Hex | Fills the screen from a captured reversal, everything pinned to a fixed value. |
Two generation methods exist for reversals specifically:
Subfields copy too, which is what a positional original-data element really needs. The Copy entry appears on a subfield only when the reversal editor opened the values window; it is never offered on a container, whose value is composed rather than set.
A field left on Copy without a source picked is omitted from the message and logged as such — never sent empty. The editor's status line counts those separately, so you can see it before the run.
The calculators that save a trip to a separate utility, and the preferences that change how the application looks and what it keeps.
Tools on the toolbar opens a set of lookups and calculators in four tabs. Nothing here reads or writes the database — it is all scratch work.
Everything the Card Data screen calculates, without needing a saved card. Keys are typed in rather than picked from the key store, which keeps the tab a pure lookup.
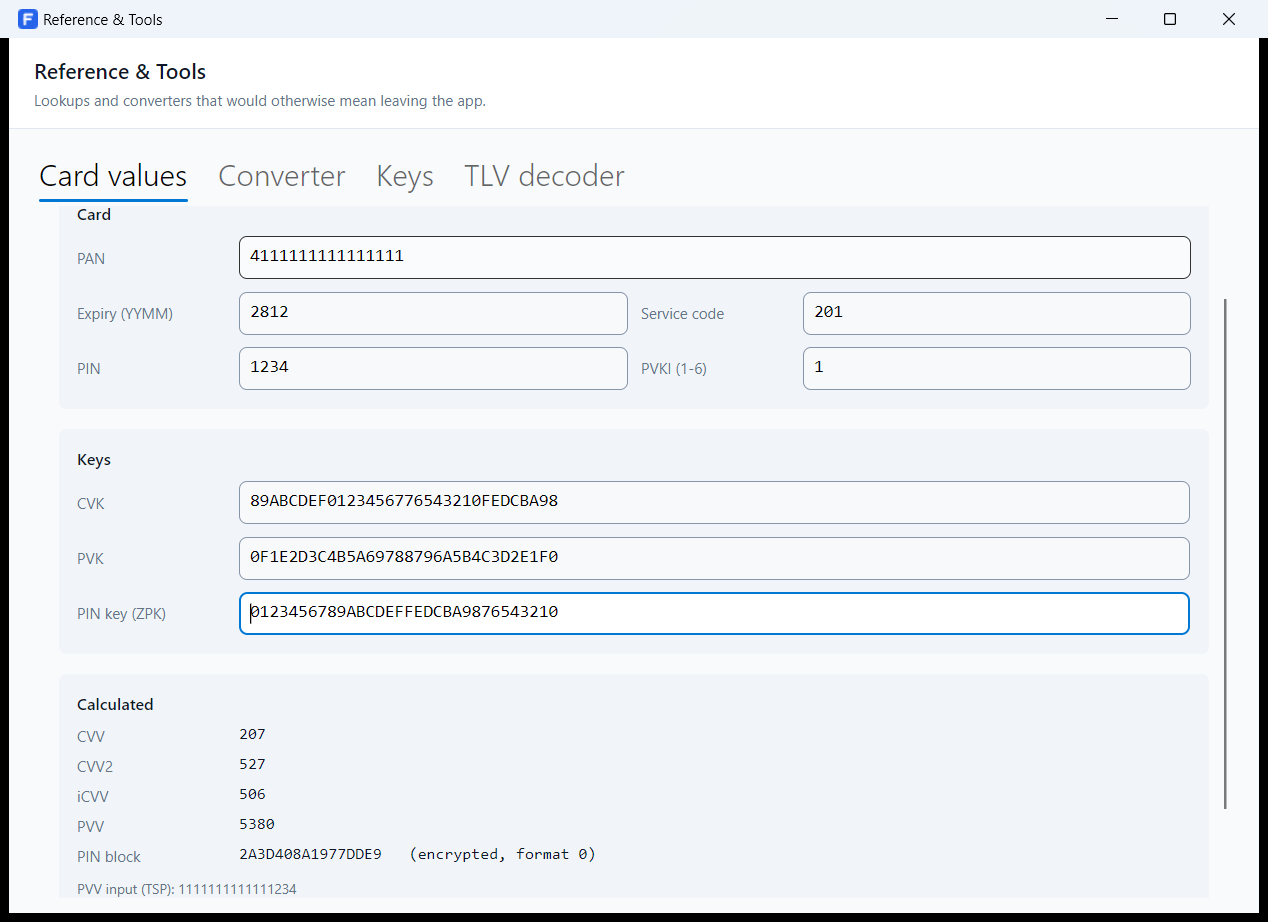
Each result names what it still needs until it has it — needs PAN, expiry, service code, CVK — so nothing is silently blank.
Paste hex, ASCII text, or EBCDIC hex; every reading is shown at once, so you do not have to say which one you meant.
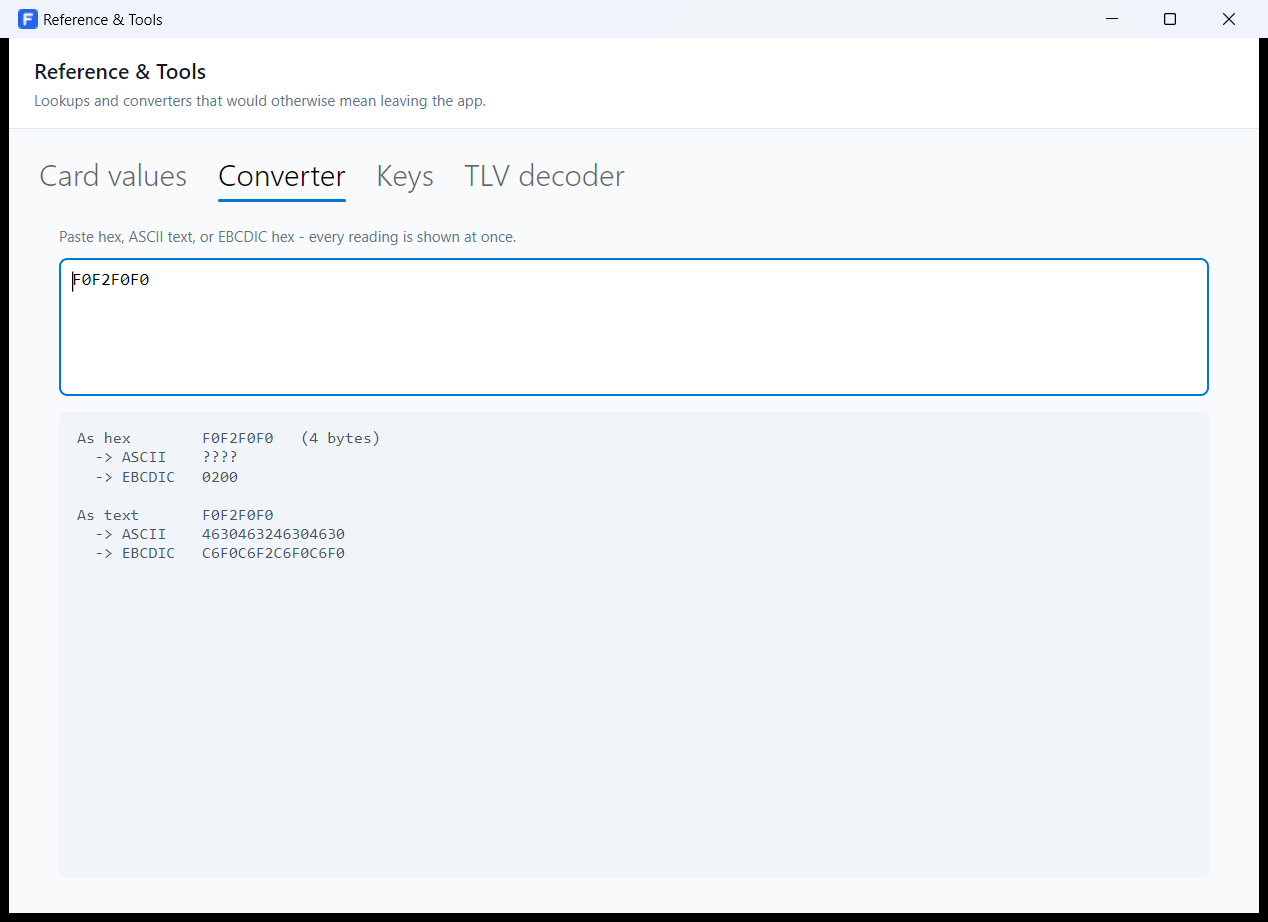
F0F2F0F0 read as hex is meaningless as ASCII but
is 0200 in EBCDIC — the single most common thing to need when reading an
EBCDIC trace.Four key utilities on one tab.
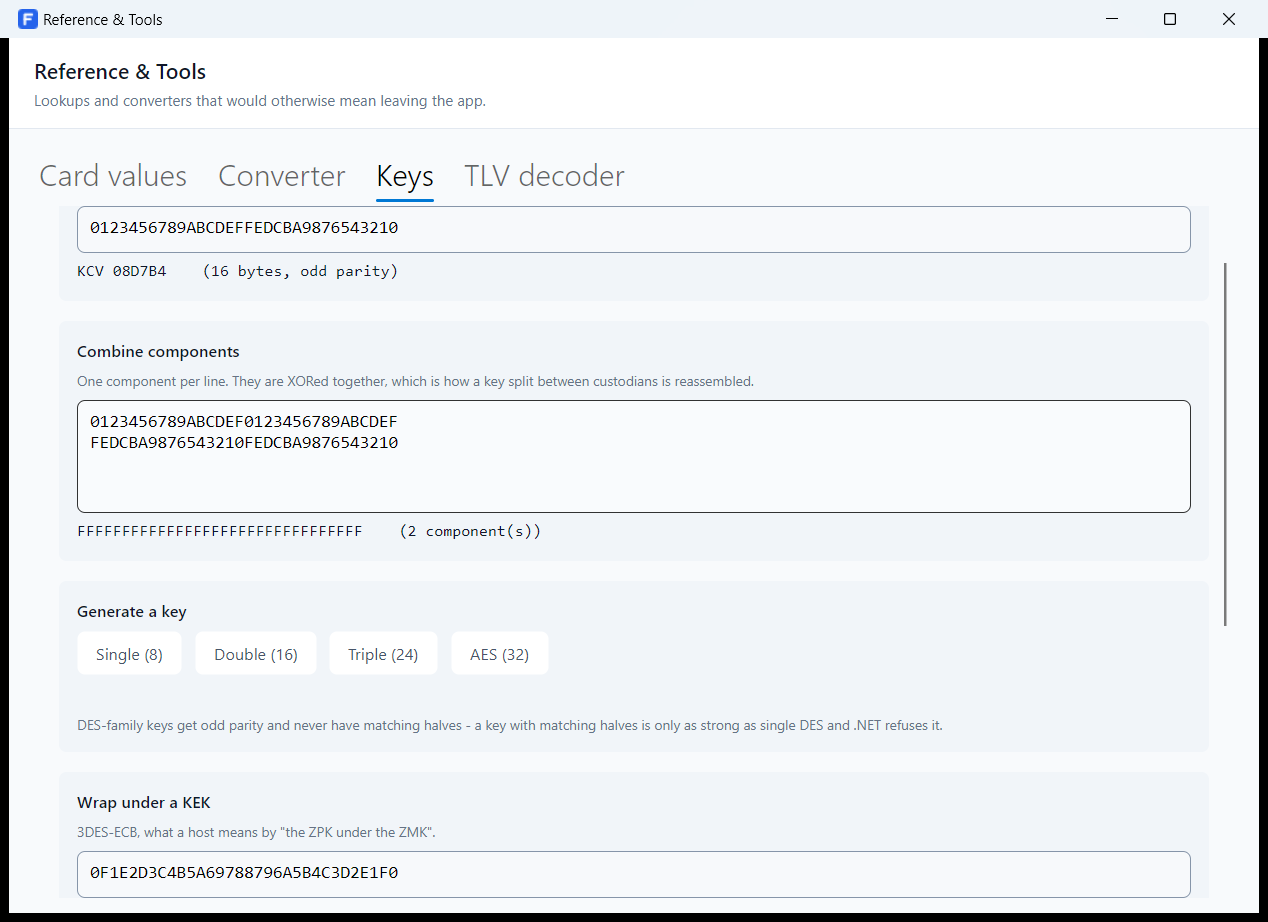
| Tool | What it does |
|---|---|
| Check value | The KCV of a 16, 32, 48 or 64 hex character key. |
| Combine components | XORs the components you paste, one per line. |
| Generate a key | Single (8), Double (16), Triple (24) or AES (32) bytes. DES-family keys get odd parity and never have matching halves. |
| Wrap under a KEK | 3DES-ECB — what a host means by "the ZPK under the ZMK". Shows the wrapped and unwrapped forms together. |
| DUKPT | Derives the device's IPEK from the BDK, then the transaction and PIN keys for the counter in the KSN. |
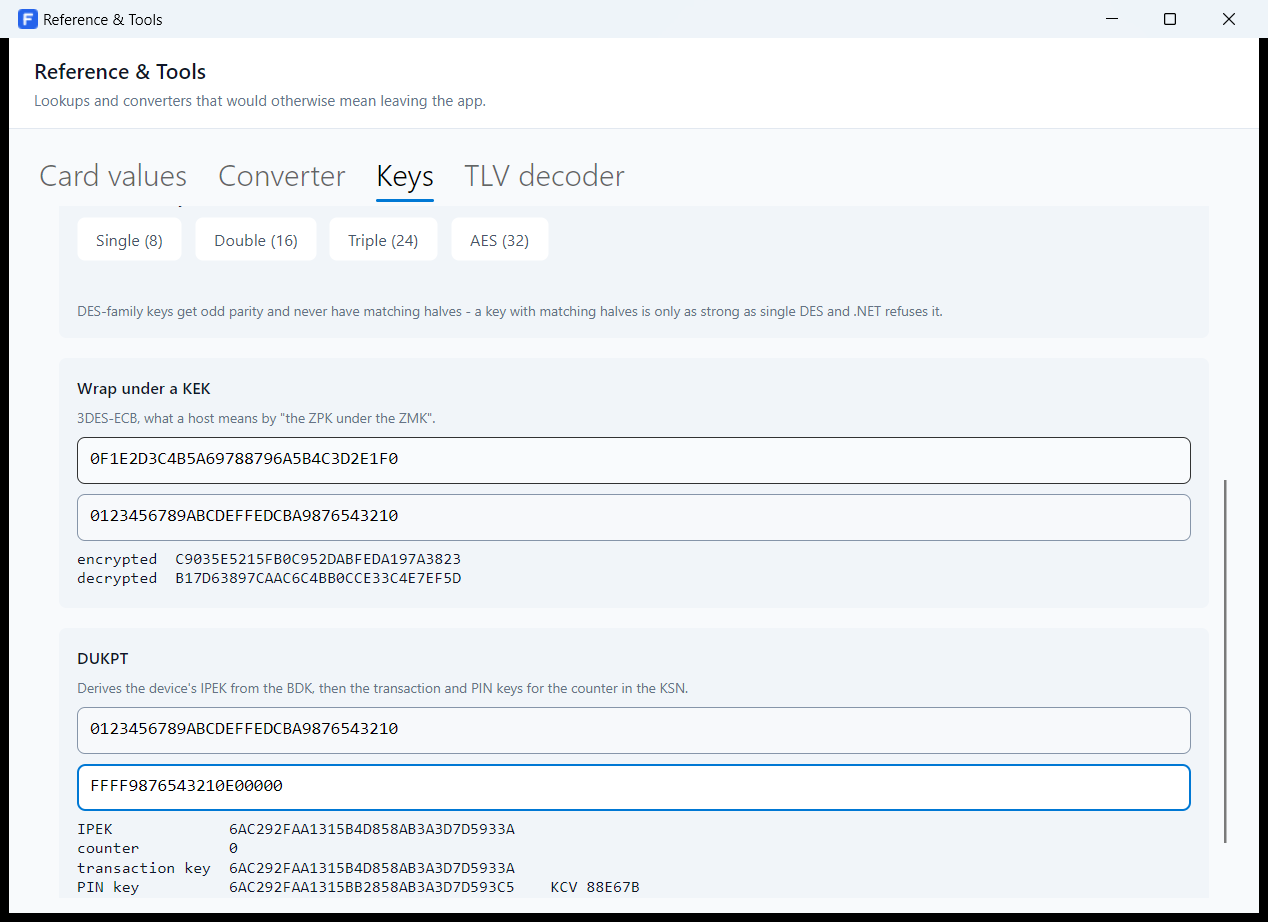
The MAC and data-encryption variants use different masks and are deliberately not implemented rather than guessed at — a wrong mask yields a plausible-looking key that no HSM agrees with.
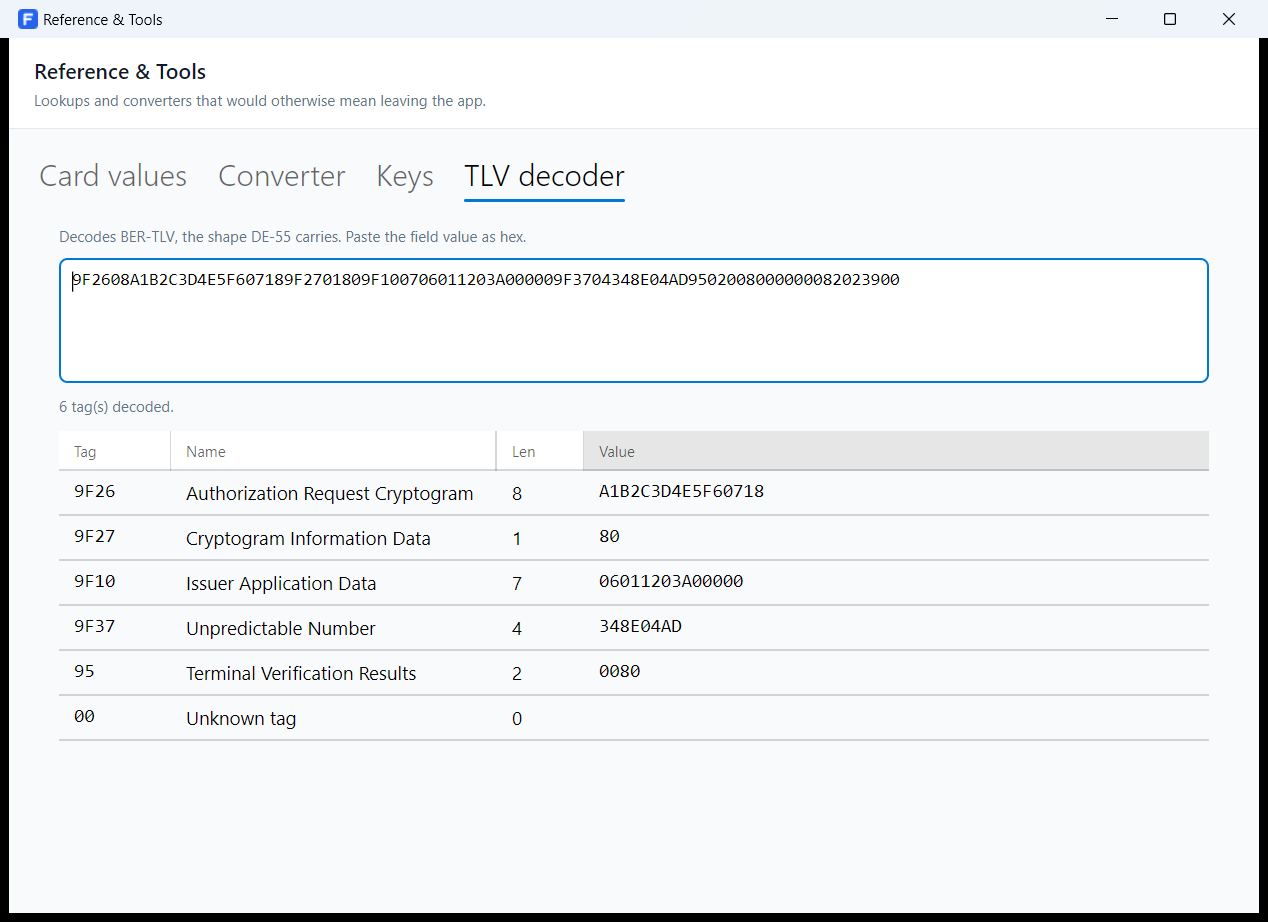
Paste a field value as hex and get the BER-TLV structure back, tag by tag, with the EMV tag names filled in.
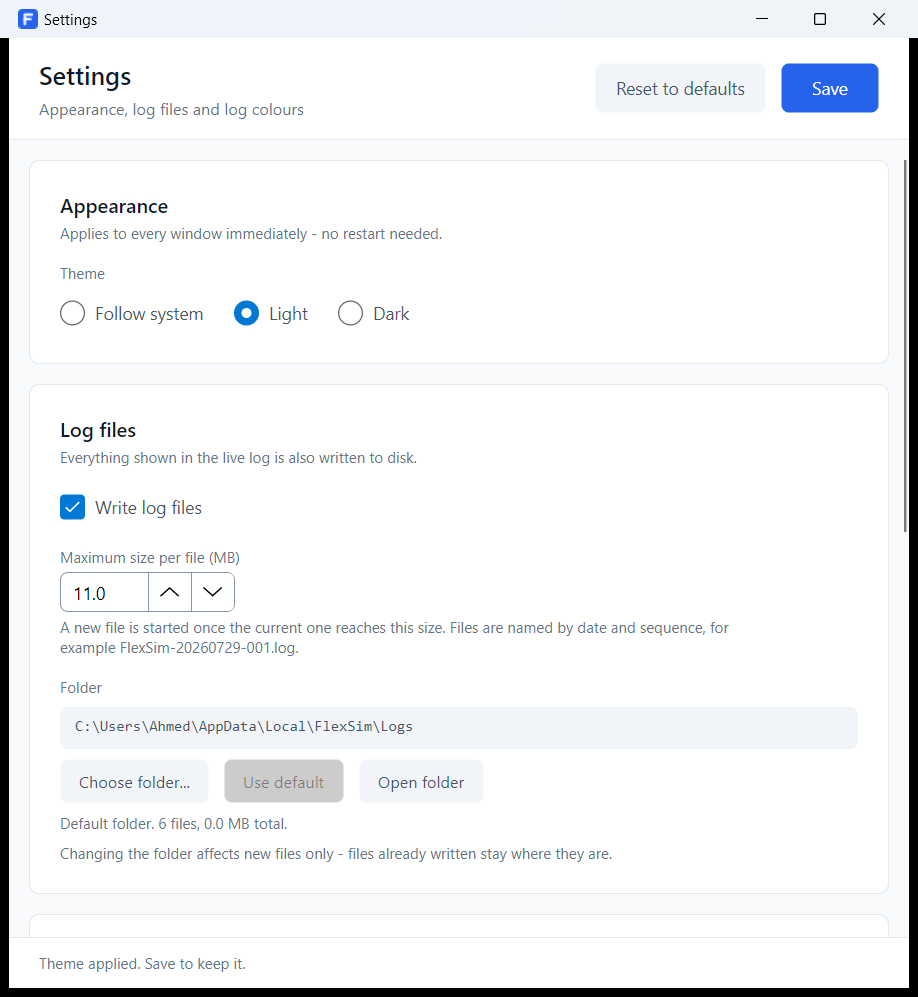
Changes apply live so you can see them, but closing the window without saving puts everything back. An experiment cannot leak into the next run.
Follow system, Light or Dark. The change reaches every open window immediately — no restart.
| Setting | Meaning |
|---|---|
| Write log files | Whether the live log is mirrored to disk at all. |
| Maximum size per file (MB) | A new file is started once the current one reaches
this size. Files are named by date and sequence, e.g.
FlexSim-20260729-001.log. Files also roll at midnight. |
| Folder | Where new files go. Use default returns to the folder beside the database; Open folder shows it in the file manager. |
Changing the folder affects new files only — files already written stay where they are. A stored folder that has gone missing or become unwritable falls back to the default at startup.
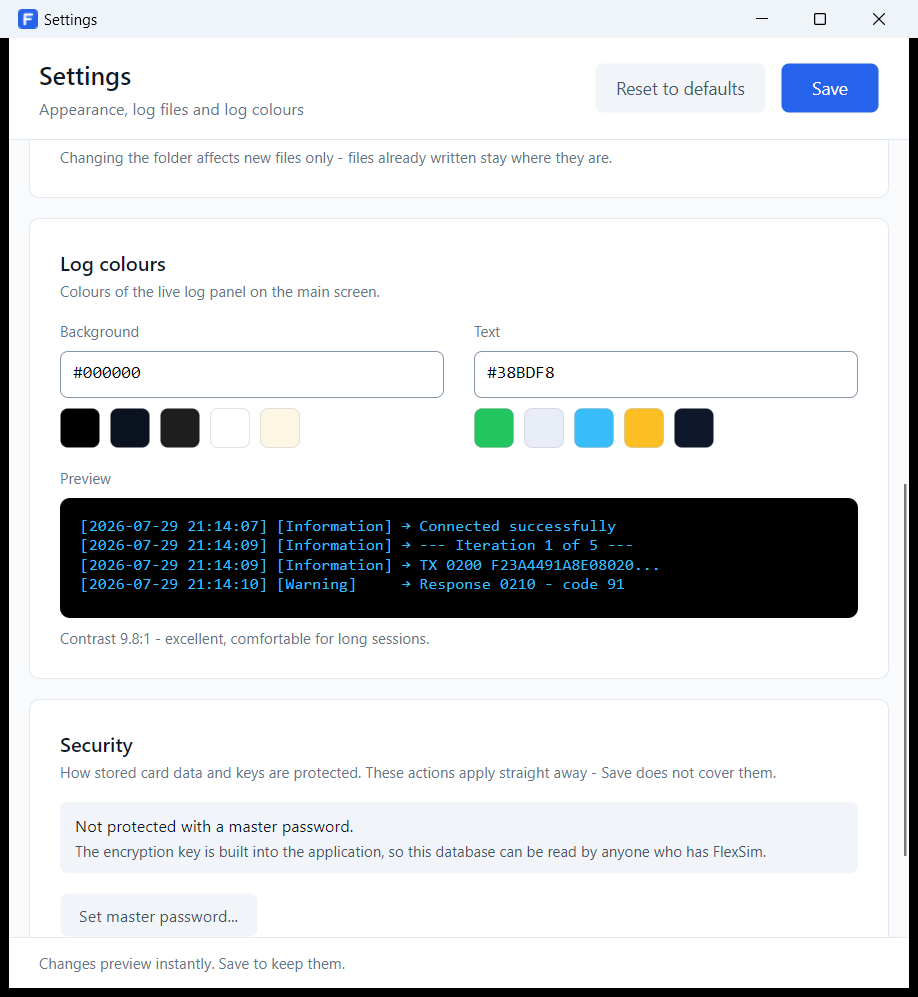
The background and text colour of the live log panel, with a preview and a contrast reading. These are yours to set and are not part of the light/dark theme.
Card data and key material are always encrypted at rest. By default the encryption key is derived from a passphrase built into the application, which means anyone with a copy of the program and your database file can read them.
Setting a master password replaces that with a key derived from your passphrase and a random salt.
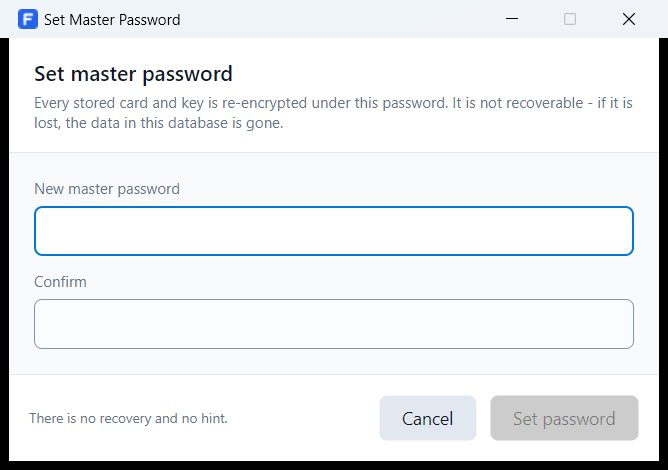
There is no reset, no hint and no back door. If the master password is lost, the card and key data in that database is gone. Everything else — suites, test cases, spec profiles, the message log — is not encrypted and survives, but every card and key has to be re-entered.
With a master password set, FlexSim opens to an unlock prompt instead of the main window. Card data and keys stay encrypted until it is entered.
A master password raises the bar considerably, but FlexSim is a desktop simulator and its threat model is a shared test machine, not a hostile adversary with your disk. Do not put production key material in it.
Four end-to-end tasks, each one a thing people actually sit down to do.
Goal. Build a 0200 purchase for a chip card, with DE-55 carrying a real ARQC, and send it.
0200 and tick the fields the switch expects. A typical
minimum:
000000, Static000000010000{{STAN}}051 (chip read), StaticGoal. Let someone else's terminal send you authorizations, and answer them — approving most, declining one card.
0500. If you are answering chip transactions, tick
DE-55 in the response and set tag 91 to Auto, then
link the case to the card so the AC key is available.Goal. Send the purchase from Example 1, then reverse it automatically.
0400 and Delay to a few seconds if you want to see
the two messages apart in the log.Goal. Check a PVV the host produced, without touching your saved cards.
The Tools window is a scratch pad. Values typed into it are not saved anywhere and no card or key is read or written.
Lookup tables, file locations, troubleshooting, and what this version cannot do.
| Method | Where offered | Value comes from |
|---|---|---|
| Static | Request, response, reversal, subfields | The Value box, with placeholders substituted |
| Auto | Request, reversal, subfields | Generated at send time — see section 17.1 |
| Card Data | Request, reversal, subfields | The linked card profile |
| Echo from request | Response, reversal | The same field number in the incoming message |
| Copy from request field | Reversal (fields and subfields) | A named, different field number in the original request |
A value that cannot be produced is omitted and logged, never sent empty. Auto and Card Data on a container subfield do nothing — a container's value is composed from its children.
| Composition | Produces |
|---|---|
| Auto | TLV if the field looks like TLV, otherwise Concat. Compatibility default; prefer an explicit setting. |
| Concat | Child values joined as entered. |
| Fixed | Each child padded or truncated to its length. N and B right-justified, zero-filled; others left-justified, space-filled. |
| Tlv | BER-TLV over the immediate children. |
| NestedTlv | BER-TLV recursing into container children, optionally wrapped in
wrapperTag. |
| TokenBuffer | Buffer header, then per element an element header and body. |
| Role | Meaning |
|---|---|
| Element | Data (default) |
| BufferHeader | Template for the header of the whole buffer |
| ElementHeader | Template for each element's header |
| Count | Filled with the number of elements emitted |
| TotalLength | Filled with the length of everything after the buffer header, element headers included |
| ElementId | Filled with the element's identifier |
| ElementLength | Filled with the element's length |
Inheritance. A child left on Auto takes NestedTlv under NestedTlv and Fixed under TokenBuffer.
| Placeholder | Substituted with |
|---|---|
{{DATE}} | Current date and time, MMDDhhmmss |
{{TIME}} | Current time, hhmmss |
{{YYYYMMDD}} | Today, yyyyMMdd |
{{STAN}} | Random six-digit trace number |
{{CARD.PAN}} | Linked card's PAN |
{{CARD.EXPIRY}} | Linked card's expiry |
{{CARD.TRACK2}} | Linked card's track 2 |
{{CARD.CVV}} | Linked card's CVV |
{{CARD.PVV}} | Linked card's PVV |
{{CARD.PVKI}} | Linked card's PVKI |
The {{CARD.*}} placeholders only substitute when the test case has a card
linked; otherwise they are left in place, which makes the omission visible in the log rather
than silent.
| Item | Where |
|---|---|
| Database (Windows) | %LocalAppData%\FlexSim\simulator.db |
| Database (Linux) | ~/.local/share/FlexSim/simulator.db |
| Database (macOS) | ~/Library/Application Support/FlexSim/simulator.db |
| Log files | Logs\ beside the database, unless you moved it in
Settings |
| Spec profile backups | SpecBackups\ beside the database, written
before a profile is refreshed on upgrade |
| First-run template | Assets\simulator.db beside the program.
Read-only, used once, then only for shipped spec profiles |
The first two lines of the log at every start are the two facts any support conversation needs: the version, and the database path.
[2026-09-12 09:12:18] [Information] → FlexSim 1.0.3
[2026-09-12 09:12:18] [Information] → Database: C:\Users\you\AppData\Local\FlexSim\simulator.db
simulator.db. If simulator.db-wal is present and
non-empty, copy that too.To move your work to another machine, install FlexSim there, run it once so the folder
exists, close it, and drop your simulator.db over the one it made.
| Symptom | What to check |
|---|---|
| Connect does nothing / times out | Host and port in the Connection window; whether the peer is listening; a firewall in between. In server mode nothing happens until the other side dials in. |
| The reply will not parse | Almost always the wrong active spec profile. Check
the profile name in the status bar. Encoding is the usual culprit — an EBCDIC
message read as ASCII produces the ????? ASCII line you can see in the
log. |
| A field is missing from the message | Look in the live log just before the send. Anything that could not be produced is logged with a reason: no card linked, no key on the card, a Copy with no source. |
| Tag 9F26 (ARQC) is empty | The test case has no card linked, or the card has no AC key selected. |
| Cryptograms fail with an unhelpful error | A 3DES key whose two halves are identical is rejected as weak. Also check the card sequence number — it goes into the key derivation. |
| Tag 91 (ARPC) is missing from a reply | No card, no AC key, or no DE-55 in the incoming request. The log names which. |
| The PVV does not match the host | Compare the TSP shown under the PVV against the host's. The PAN digits used exclude the check digit. |
| A field goes out padded with spaces | The profile has it as fixed-length where the switch expects a variable-length field. Change its Type to LLVAR or LLLVAR in the spec editor. |
| A variable field goes out with two length prefixes | The profile has a length indicator declared as a subfield and the codec is writing one. Clear the subfield — the codec adds the prefix itself. |
| Suites disappeared | Suites belong to a spec profile. Check which profile is active in the status bar. |
| A corrected spec profile did not arrive on upgrade | FlexSim never overwrites a profile you have edited. The startup log names any profile it skipped for that reason. |
| Nothing is written to the log folder | Check Write log files in Settings, and whether the chosen folder is still writable — an unwritable one falls back to the default at startup. |
These are things the interface appears to offer that this version does not yet do. They are listed so that time is not lost looking for a fault that is not there.
| Area | Current behaviour |
|---|---|
| Framing dropdown | The 2-Byte Header / 4-Byte Header / TPDU / Raw choice is saved but not applied. Every connection uses the two-byte big-endian length header. |
| Use TLS / SSL | The checkbox and path are saved but the connection is not switched to TLS. |
| Suite runs | The machinery for running a whole suite and reporting pass/fail per case exists, and expected-response rules are stored and edited, but there is no button that starts a run in this build. Rules you set are kept and will apply when that returns. |
| Result export | CSV and HTML report export belong to the suite-run window, and are therefore not reachable either. |
| Reference lookups | The Tools window has four tabs — Card values, Converter, Keys, TLV decoder. Response-code and currency lookups are not present in this version. |
| Term | Meaning |
|---|---|
| ARC | Authorisation Response Code, the issuer's answer inside the ARPC. |
| ARPC | Authorisation Response Cryptogram — the issuer's signed reply to the card's ARQC, carried in EMV tag 91. |
| ARQC | Authorisation Request Cryptogram — the card's signature over the transaction, EMV tag 9F26. |
| ATC | Application Transaction Counter, EMV tag 9F36. Steps on every transaction. |
| BDK | Base Derivation Key, the root of a DUKPT scheme. |
| BER-TLV | The tag-length-value encoding EMV data uses. |
| CSU | Card Status Update — four bytes carrying the issuer's decision under ARPC method 2. |
| CVK / CVV / iCVV | Card verification key, and the values it produces. The iCVV is the chip variant, sent in a chip transaction's track 2 in place of the CVV. |
| DE | Data element — one numbered field of an ISO 8583 message. |
| DUKPT | Derived Unique Key Per Transaction. A device holds one initial key and derives a fresh one for every transaction. |
| EBCDIC | IBM's character encoding, still used by many switches. Digit 0 is
0xF0, not 0x30. |
| IPEK | Initial PIN Encryption Key — the per-device key derived from the BDK and the KSN. |
| KCV | Key Check Value. A short value derived from a key, used to confirm two parties hold the same key without exchanging it. |
| KEK | Key Encryption Key — a key used to wrap other keys for transport. |
| KSN | Key Serial Number. Identifies a DUKPT device and carries its transaction counter. |
| MTI | Message Type Indicator, the four digits at the front of the message (0200, 0210, 0400, 0800…). |
| PVK / PVV / PVKI | PIN verification key, the value it produces, and the index saying which key was used. |
| STAN | Systems Trace Audit Number, DE-11. |
| TSP | Transformed Security Parameter — the constructed input to the PVV calculation. |
| ZMK / ZPK | Zone master key and zone PIN key. The ZPK encrypts PIN blocks; the ZMK is what a ZPK is exchanged under. |
FlexSim 1.0.3 — User Manual · 12 September 2026 · Developed by Ahmed Telleb